Replace Your House Siding Like a Pro: Step-by-Step Guide
Damaged siding can decrease your property value by up to 10%, making replacement one of the most...

Drywall cracks appear in nearly every home at some point, whether they show up suddenly after a storm or develop slowly as your house settles. These common imperfections stem from house settling, humidity changes, poor installation work, or structural movement—but most can be fixed with basic tools and techniques. Repairing drywall cracks is a manageable DIY project that requires minimal investment in materials. You can tackle most crack repairs yourself, from hairline surface cracks to larger seam failures. This guide walks you through identifying what caused your cracks, choosing the right repair method for different crack types and locations, and preventing future damage to keep your walls smooth. You'll learn specific techniques for ceiling cracks, corner repairs, and seam fixes, plus discover when a crack signals a bigger problem that needs professional attention. Most crack repairs cost under $20 in materials and can be completed in a weekend, making this one of the most cost-effective home improvements you can make.
Cracks appear for specific reasons, and identifying the cause helps you choose the right repair approach. Understanding what's behind your particular crack also prevents the problem from returning after you've completed the fix.
Houses settle naturally as the soil beneath them compresses under the structure's weight. New homes experience the most settling during their first 2-3 years, but older homes continue to shift gradually over time.
Foundation movement creates stress that transfers directly to your drywall. Structural cracks typically show up:
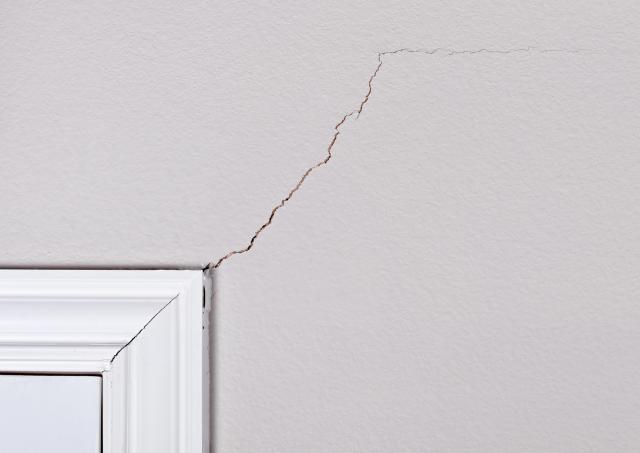
Diagonal cracks running from window or door corners often signal foundation issues. Cracks wider than 1/8 inch or multiple diagonal cracks throughout your home warrant a structural engineer's evaluation before you attempt repairs.
Wood framing expands and contracts with humidity changes, while drywall remains relatively stable. This creates stress at the connection points between materials, eventually resulting in cracks.
Homes in areas with dramatic seasonal weather shifts face higher risks of temperature-related cracking. Poor insulation or inadequate climate control compounds the problem by allowing greater temperature swings inside your home.
Pro Tip: Keep indoor humidity between 30-50% year-round to minimize the expansion and contraction that stresses drywall joints.
Installation errors cause many drywall cracks, often appearing months or years after the work is completed. Common problems include:
|
Installation Error |
Crack Type |
Where It Appears |
|---|---|---|
|
Inadequate taping |
Hairline cracks |
Along seams |
|
Too little joint compound |
Visible tape lines |
Panel joints |
|
Improper screw placement |
Popped screws |
Throughout wall |
|
Insufficient drying time |
Shrinkage cracks |
Around taped areas |
Rushed installation significantly increases the risk of future cracks. Each coat of joint compound must dry completely before applying the next layer—a step many installers skip to save time.
Water weakens drywall's structural integrity faster than any other factor. Even small leaks cause sagging, bubbling, and cracking over time.
Water damage signs include:
Water-damaged drywall usually requires complete replacement rather than crack repair. You'll need to fix the moisture source before attempting any repairs, or the problem will return.
Most cracks can be repaired with basic techniques, but some indicate serious structural problems requiring professional help. Correctly identifying the cause helps you decide whether this is a DIY project or time to call an expert.

Hairline cracks measure less than 1/16 inch wide and appear as thin, straight lines across wall surfaces. These surface-level cracks typically develop from normal house settling or minor seasonal movement. You'll most often find them:
These minor imperfections rarely signal structural issues, but track their progress over time. Hairline cracks that suddenly widen or multiply deserve closer inspection.
Ceiling cracks require careful evaluation since their causes and severity vary significantly. The pattern and location tell you what you're dealing with:
|
Crack Pattern |
Likely Cause |
Action Needed |
|---|---|---|
|
Straight lines between sheets |
Poor taping or normal settling |
Standard repair |
|
Spider-web pattern |
Impact damage or structural movement |
Monitor closely |
|
Cracks with discoloration |
Water leaks from the roof or plumbing |
Fix the leak first |
|
Around light fixtures |
Improper installation weight |
Reinforce mounting |
Ceiling cracks with sagging need immediate attention—this often indicates water damage or structural problems. Cracks running parallel to ceiling joists usually point to installation issues rather than structural concerns.
Seam cracks appear where drywall panels meet and typically result from poor taping work or normal expansion and contraction. These straight-line cracks often become visible seasonally when temperature changes cause movement.
Check whether you can see the tape underneath or notice bubbling—this indicates insufficient joint compound during original installation. Seam cracks that appear and disappear with seasons suggest normal house movement rather than structural problems.
Fixing seam cracks properly requires removing the old tape completely before applying new materials. Attempting to patch over a failed tape almost guarantees the crack will return.
Corner cracks form where walls meet other walls or ceilings. These areas handle stress from multiple sources:
Corner cracks often worsen during certain seasons and may improve during others. However, persistent corner cracking combined with other structural symptoms might indicate foundation movement.
Pro Tip: Use paper tape rather than mesh tape for corner repairs. Paper tape folds cleanly at angles and provides stronger reinforcement for these high-stress areas.
Diagonal cracks running at roughly 45-degree angles represent the most serious type of drywall damage. These cracks, especially those following stair-step patterns, frequently indicate:
Crack width matters significantly for diagonal patterns. Hairline diagonal cracks may result from minor settling, while cracks wider than 1/8 inch typically require professional evaluation. If these cracks appear alongside sticking doors, uneven floors, or windows that won't open properly, contact a structural engineer before attempting repairs.
Identifying your crack type correctly determines the right repair approach and whether you can handle the work yourself. The following sections cover specific repair techniques for each location and severity level.
Fixing drywall cracks requires the right tools and techniques, but most repairs can be completed in a weekend. This step-by-step approach works for most crack types and ensures your repair lasts.
Surface preparation determines whether your repair will hold or fail within months. Gather these essential tools before starting:
|
Tool |
Purpose |
|---|---|
|
Utility knife |
Widening cracks and removing loose material |
|
Sandpaper (150-grit) |
Smoothing edges around the crack |
|
Vacuum or brush |
Removing dust and debris |
|
Putty knife |
Applying compound |
Use your utility knife to widen the crack slightly, creating a "V" shape that helps the repair compound bond properly. Remove any loose drywall pieces from the crack, then sand the area lightly to smooth rough edges.
Pro Tip: Clean the crack thoroughly with a damp cloth and let it dry completely before applying materials. Dust, oil, or moisture prevents proper adhesion and causes repair failure.
Choose your filler material based on crack size. Hairline cracks under 1/8 inch wide work well with lightweight spackling compound, while larger cracks need premixed all-purpose joint compound for durability.
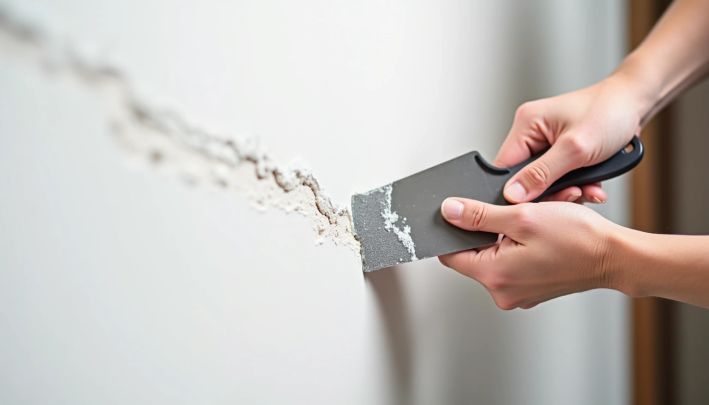
Apply compound with your putty knife at a 45-degree angle, pressing firmly to force material into the crack. Spread the compound about 2 inches wide on either side of the crack. Focus on filling the crack completely rather than creating a smooth finish—that comes later.
Cracks wider than 1/8 inch or those that keep reappearing need reinforcement with drywall tape. You can choose between self-adhesive mesh tape or paper tape, with paper tape providing stronger repairs for corners and ceilings.
Apply mesh tape directly over the crack before adding compound. Paper tape requires embedding in wet compound first, but creates more durable repairs. After placing tape, spread a thin compound layer over it, feathering the edges to blend with the surrounding wall. Allow 24 hours for complete drying before proceeding.
After the first layer dries completely, you'll notice the compound has shrunk slightly—this is normal. Start sanding with 150-grit sandpaper, then finish with 220-grit for smoothness. Sand in circular motions until the repair feels level with the surrounding wall.
Apply a second, thinner coat of compound, extending it 2-3 inches beyond the first coat's edges. After this coat dries, sand it again until it is perfectly smooth. Many repairs need a third thin "finishing" coat for seamless results.
Joint compound absorbs paint differently than drywall, making repairs visible unless properly primed first. Apply drywall primer to the repaired area, extending slightly beyond the patched section.
Once the primer dries, match your existing wall paint. Paint from the repaired area to the nearest corner or door frame rather than just painting the patch—this prevents visible color differences. For ceiling repairs, use a roller with an extension pole for safety and better results.
Best for: Most drywall cracks under 1/4 inch wide that aren't caused by structural issues
Different crack locations need specific repair approaches to create lasting fixes. Ceiling cracks fight against gravity, seam cracks often indicate tape failure, and corner cracks occur where different structural elements meet. Adapting your technique based on location prevents repeated repairs.
Ceiling repairs present unique challenges since gravity works against your compound application. Use setting-type joint compound instead of premixed varieties for ceiling work—it dries harder and won't sag as easily.
Apply painter's tape around the repair area to catch drips, then work with slightly thicker compound to prevent sagging. Apply multiple thin coats rather than trying to fill deep cracks in one pass.
Pro Tip: When working overhead, hold a piece of cardboard next to your putty knife to catch excess compound and prevent it from dripping on your face or floor.
Check for water damage before starting any ceiling crack repair. Stains or soft spots around the crack indicate moisture problems that need fixing first.
Seam cracks typically mean the original tape has failed or wasn't installed properly. These require complete tape removal before you can make an effective repair.
Remove all loose or bubbling tape, then clean the seam area thoroughly. Apply new paper tape embedded in fresh joint compound, feathering the compound at least 6-8 inches on each side of the seam.
For seam cracks that keep coming back, fiberglass mesh tape provides superior strength, though it creates a slightly thicker repair line.
Corner cracks require different materials and techniques depending on their location. These areas experience stress from the interaction of different structural elements that move at varying rates.
|
Corner Type |
Best Tape Type |
Application Technique |
|---|---|---|
|
Inside corners |
Paper tape |
Fold tape along the center crease before applying |
|
Outside corners |
Metal or vinyl corner bead |
Cut the damaged section and replace it entirely |
|
Ceiling-wall corners |
Paper tape |
Apply to the ceiling side first, then the wall |
Use a corner trowel for inside corners to achieve clean, sharp angles. Avoid building up too much compound in corners—this creates bulky, unprofessional-looking results.
Corner cracks that return repeatedly despite proper repair may indicate structural movement. Consider using flexible acrylic caulk along with traditional drywall compound for these persistent problem areas.
Best for: Corner repairs work best when you address the underlying cause of movement, whether it's seasonal expansion or structural settling.
Preventing cracks before they start saves you time and money compared to repeated repairs. Focus on controlling the conditions that stress drywall, and you'll avoid most crack problems before they develop.
Consistent humidity levels prevent the expansion and contraction cycles that create stress in your walls. Keep indoor humidity between 30-50% year-round to minimize wood movement behind your drywall.
|
Season |
Recommended Humidity |
Prevention Tool |
|---|---|---|
|
Winter |
30-40% |
Humidifier |
|
Summer |
40-50% |
Dehumidifier |
|
Spring/Fall |
35-45% |
Monitor only |
Install a basic hygrometer in your main living areas for $10-15 to track humidity changes before they cause damage. These simple devices help you spot problems early and adjust your climate control accordingly.
Better materials during initial installation prevent most crack problems:
Setting-type compounds create stronger chemical bonds as they cure, unlike premixed varieties that simply dry out. This extra strength helps joints withstand normal household movement without cracking.
Areas where different materials meet or structural elements intersect need extra protection. Install metal corner beads on outside corners and use flexible caulk where drywall meets different materials like brick or concrete.
Consider resilient channel installation between ceiling joists and drywall to absorb movement. Door frames and window openings benefit from additional screws to distribute stress more evenly across the drywall.
Water damage destroys drywall faster than any other factor. Check under sinks, around windows, near plumbing fixtures, and along ceiling edges regularly for discoloration or soft spots.
Examine exterior walls after heavy rain for signs of moisture getting through. Fix even small leaks immediately—slow drips weaken drywall over time and lead to cracks that could have been prevented.
Best for: Homeowners who want to avoid repeated crack repairs and maintain smooth walls long-term
Drywall cracks range from simple cosmetic fixes to warning signs of structural issues. The key is identifying what caused the crack before choosing your repair approach. Most homeowners can handle basic crack repairs with standard tools and materials, but diagonal cracks wider than 1/8 inch warrant professional evaluation.
Different crack locations require different strategies. Ceiling repairs need a thicker compound to fight gravity, seam cracks often need complete tape removal and replacement, and corner repairs work best with paper tape rather than mesh. Match your repair method to the crack type and location for lasting results.
Prevention saves time and money over repeated repairs. Keep indoor humidity between 30-50% year-round, address water leaks immediately, and use quality materials during any drywall work. These steps cost less than dealing with recurring crack problems.
Address cracks while they're still small and manageable. A hairline crack fixed with spackling compound takes minutes, while ignored cracks can lead to larger repairs requiring tape, multiple coats, and repainting entire wall sections. Regular inspection helps you catch problems early when they're easier and cheaper to fix.
GET THE ESSENCE OF RELEVANT HOME
IMPROVEMENT TOPICS IN LESS THAN 5 MINUTES

Replace Your House Siding Like a Pro: Step-by-Step Guide
Damaged siding can decrease your property value by up to 10%, making replacement one of the most...

Leaky windows allow 25%-30% of your home's heat to escape, making exterior window caulking one of...

Thanks for joining our homeowners’ community.
Stay tuned!
Choose the category
Choose the category