Standing Seam Metal Roof: Smart Buyer's Guide for Homeowners
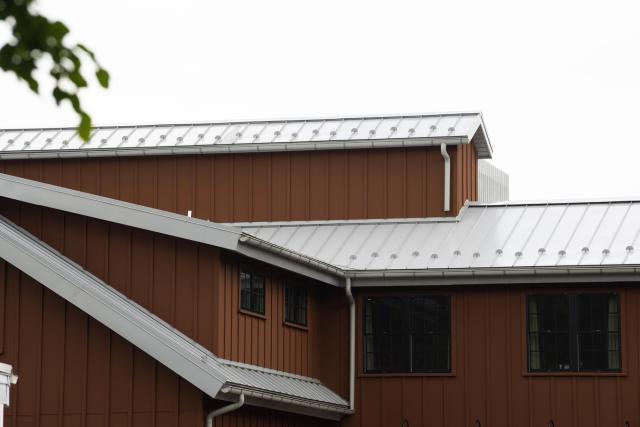
Standing seam metal roofs cost between $7.54 and $39.43 per square foot, making them a significan...

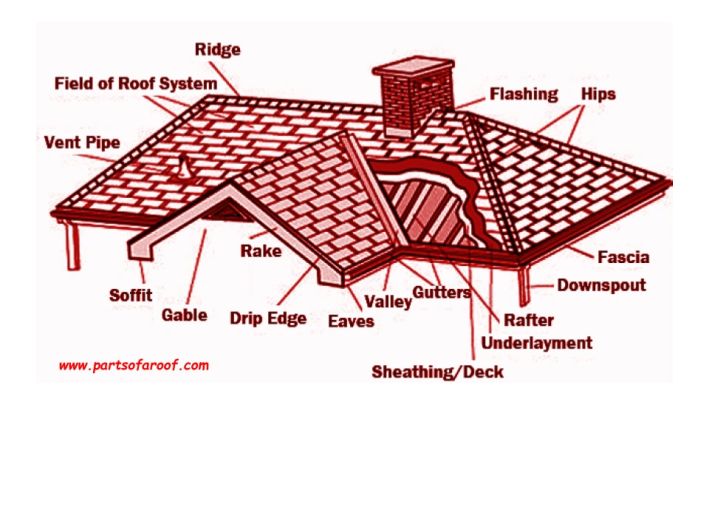
Your roof protects your home through a complex system of structural and protective components working together. While most homeowners focus on the visible shingles or tiles, the real story happens beneath the surface, where rafters, underlayment, flashing, and ventilation systems determine your roof's performance and longevity. Most people are unaware of the numerous critical elements that comprise their roof structure. Beyond the obvious covering materials, you'll find structural frameworks such as rafters and trusses, as well as waterproof barriers, including underlayment and ice shields. Additionally, you'll find essential components like fascia boards, soffit vents, and specialized flashing around chimneys and valleys. Understanding these roof components helps you make smarter maintenance choices and communicate more effectively with roofing contractors. You'll also spot potential problems before they turn into expensive repairs. This guide breaks down every part of your roof's anatomy, from the peak ridge down to the eaves, so you can protect one of your home's most important investments.
 Every roof starts with a structural framework that bears the weight of all other components while withstanding environmental pressures for decades. These essential elements create the shape and support system that determines your roof's load capacity and overall performance. Three primary structural components form this critical foundation.
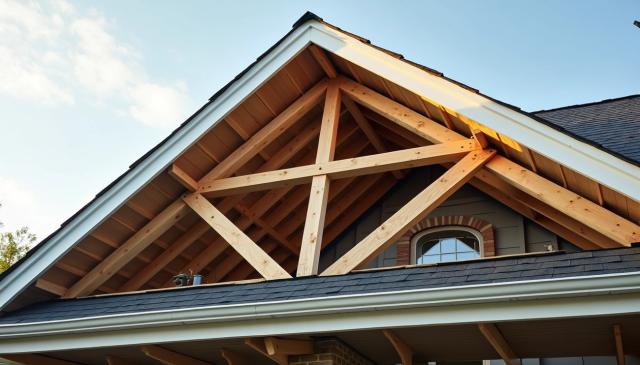
Rafters and trusses create the skeletal framework of your roof system. Rafters consist of individual sloped beams running from the ridge to the wall plate, while trusses are pre-manufactured triangular units that span the entire roof width.
|
Feature |
Rafters |
Trusses |
|---|---|---|
|
Materials |
2×10 or 2×12 lumber (sometimes steel) |
Primarily 2×4 lumber in a triangular design |
|
Installation |
Built on-site |
Factory-manufactured, installed as units |
|
Spacing |
16-24 inches apart on center |
24 inches apart on center (typical) |
|
Attic Space |
Creates an open attic space |
Limits usable attic space |
|
Cost |
Higher labor costs |
Lower overall cost |
Most modern construction uses trusses because they require fewer materials while maintaining structural integrity. The roof span determines lumber size—2×4, 2×6, or 2×8—with spacing typically set at 24 inches for standard materials and 16 inches for heavier coverings like slate or clay tiles.
Best for: Trusses are well-suited for most residential applications, while rafters are ideal for homes that require open attic space or custom roof designs.
Roof decking attaches directly to rafters or trusses, creating the solid foundation for all other roof layers. This component provides the essential nailing surface for underlayment and roofing materials.
Most decking uses either plywood or oriented strand board (OSB), with thicknesses ranging from ½" to ⅝". OSB has gained popularity for decking applications because its cross-oriented wood strands provide excellent strength, particularly on homes with 24-inch truss spacing.
Pro Tip: During roof replacement, inspect existing decking for water damage, warping, or rot. Compromised decking must be replaced before installing new roofing materials to prevent structural problems and ensure proper attachment.
Purlins are horizontal beams installed across rafters to provide additional structural support. Builders use them primarily when they need to increase roof spans without upgrading to larger, more expensive rafters.
These reinforcing components allow more economical construction while maintaining structural integrity. Purlins help prevent roof sagging and failure under heavy loads from snow, roofing materials, or other stresses.
Purlins also serve as attachment points for certain roofing materials. For tile and slate roofs, battens (thin horizontal planks) are often installed over the decking, serving a similar purpose by providing secure anchoring points for these heavier materials.
Your roof's protective barrier system sits between the structural decking and visible exterior materials. These waterproof layers provide your home's secondary defense when primary roofing materials fail or are damaged by weather, age, or impact.
Underlayment creates a critical moisture barrier installed directly over the roof decking. This protective layer prevents water from reaching the wooden structure beneath your shingles, tiles, or other roofing materials.
|
Underlayment Type |
Composition |
Weight/Thickness |
|---|---|---|
|
Felt Underlayment |
Organic material or paper saturated in asphalt |
No. 15 (15 lbs/sq ft) |
|
Synthetic Underlayment |
Polymer materials |
Lightweight, variable thickness |
|
Self-Adhering (Ice/Water Shield) |
Rubberized asphalt with adhesive backing |
Thicker than standard underlayment |
Felt underlayment—sometimes referred to as tar paper—has protected roofs for decades. No. 30 felt offers better durability than No. 15 for most residential applications, while No. 15 works fine for lighter roofing projects. You can apply multiple layers in areas with harsh weather conditions for extra protection.
Pro Tip: Ice/water shield is essential along eaves in freezing climates to prevent ice dam damage. This self-adhering membrane seals around nail penetrations to create a watertight barrier.
Starter shingles form the first row along your roof's edge. These specialized components differ from regular shingles because they're designed to:
You install starter shingles directly over the underlayment and drip edge along both eaves and rakes. Most starter shingles include an adhesive strip that bonds securely to your first row of regular shingles, preventing wind from lifting the shingle edges.
Properly installed starter shingles also establish the correct overhang at your eaves, directing water into gutters rather than behind them, where it could damage your fascia board and roof deck.
Your roof's exterior layer creates the first impression and provides the primary defense against weather elements. These materials not only protect your home from rain, snow, and sun but also significantly impact your property's curb appeal and energy efficiency.
Roof coverings come in several materials, each offering distinct advantages for different situations:
|
Material Type |
Lifespan |
Key Characteristics |
Best For |
|---|---|---|---|
|
Asphalt Shingles |
15-30 years |
Affordable, easy installation |
Most residential applications |
|
Slate Shingles |
75-200 years |
Natural stone, very heavy |
Historic and luxury homes |
|
Cedar Shake |
20-40 years |
Natural wood appearance |
Rustic and craftsman styles |
|
Metal Shingles |
30-50 years |
Lightweight, fire-resistant |
High wind and wildfire areas |
|
Clay/Concrete Tiles |
50+ years |
Distinctive Mediterranean look |
Warm climates, tile-style homes |
|
Standing Seam Metal |
30-50 years |
Minimal seams, sleek profile |
Modern and contemporary designs |
|
Metal Panels |
40-70 years |
Large coverage, very durable |
Commercial and rural buildings |
Your choice depends on several key factors: local climate conditions, your roof's load-bearing capacity, building codes, and budget constraints. Hip roof designs work well with most materials since the sloped sides naturally shed water.
Pro Tip: Consider your region's weather patterns when choosing roofing materials. Areas with heavy snowfall benefit from lightweight options to prevent structural stress, while hurricane-prone regions require wind-resistant materials like metal panels for maximum protection.
Ridge capping covers the highest peak where two roof planes meet, creating both protection and a finished appearance. This component serves three critical functions:
The ridge cap material typically matches your primary roofing choice. Asphalt shingle roofs use specially designed ridge cap shingles that fold over the peak, while tile roofs require dedicated ridge tiles that complement the roof's architectural style.
Ridge vents combine capping with ventilation functions. These specialized components cover the roof peak while maintaining proper attic airflow, allowing hot air to escape while preventing water intrusion. This dual-purpose design extends your entire roof system's lifespan by managing both moisture and temperature.
Best for: All roof types benefit from proper ridge capping, with ventilated options particularly valuable in climates with hot summers or cold winters.
Your roof's perimeter and ventilation elements work together to manage water runoff and maintain proper attic airflow. These finishing components prevent moisture damage and extend your roof's lifespan while creating the polished appearance that defines your home's curb appeal.
Edge components serve dual purposes—they create clean, finished lines while protecting vulnerable areas from water damage:
|
Component |
Location |
Primary Function |
|---|---|---|
|
Drip Edge |
Roof's edge |
Channels water away from the fascia into the gutters |
|
Fascia |
Vertical finishing board |
Supports gutters, seals roof edges |
|
Soffit |
Underside of eaves |
Enables attic ventilation, blocks pests |
|
Eaves |
Roof overhang |
Directs water away from exterior walls |
Drip edge consists of specially shaped metal flashing that prevents water from flowing behind gutters and damaging the fascia board and roof deck. Fascia boards provide the smooth, vertical surface that supports your gutter system while sealing the roof's edge.
Pro Tip: Soffit vents work hand-in-hand with ridge vents to create balanced airflow—they draw fresh air into your attic that pushes hot, moist air out through higher exhaust vents.
Effective roof ventilation prevents moisture buildup, reduces cooling costs, and stops ice dams from forming. The system requires both intake and exhaust vents working together:
Exhaust vents remove hot attic air:
Intake vents bring fresh air into the attic:
Poor attic ventilation can damage shingles due to trapped heat and moisture, while also increasing your energy bills. Maintaining proper airflow through these components can add 10 to 15 years to your roof's lifespan.
Your roof's water management system determines whether minor weather events cause major damage or simply run off harmlessly. Even premium roofing materials fail without proper water diversion, making these components critical to your roof's long-term performance.
Flashing consists of thin metal strips installed at roof joints and penetrations to direct water away from vulnerable areas. These strips prevent leaks where different roof planes meet or where objects, such as chimneys, penetrate the roof surface.
|
Flashing Type |
Location |
Primary Function |
|---|---|---|
|
Chimney Flashing |
Base of the chimney |
Creates a watertight seal between the chimney and the roof |
|
Valley Flashing |
Where two roof planes meet |
Channels water down the valley to the gutters |
|
Step Flashing |
Walls, dormers |
Directs water away in overlapping "steps" |
Chimney flashing comprises multiple components that work together: base flashing at the bottom, step flashing along the sides, and counterflashing embedded in mortar joints. Each piece must overlap correctly to prevent water infiltration.
Pro Tip: Inspect your flashing annually for signs of rust, separation, or damaged sealant. These areas fail first and cause the most expensive water damage.
Gutters form your roof's final line of defense against water damage. These channels collect rainwater from the eaves and direct it safely away from your foundation and exterior walls.
Most gutters are made from aluminum, while copper and galvanized steel offer premium alternatives with distinctive appearances. Properly sized gutters must handle the water volume your roof generates during heavy storms—undersized gutters overflow and defeat their purpose.
Downspouts complete the water management system by carrying collected water from gutters to ground level. Install one downspout for every 40 feet of gutter for optimal performance. Splash blocks at the bottom prevent erosion by dispersing water away from your foundation.
Best for: Preventing foundation damage and protecting your home's structural integrity through effective water diversion.
Your home's roof shape determines both its visual appeal and weather performance. These architectural elements work together to manage water flow, resist wind forces, and create the distinctive profile that defines your home's character.
Roof architecture centers around four key elements that shape how your roof performs and looks:
|
Element |
Description |
Function |
|---|---|---|
|
Valley |
Interior angle where planes meet |
Collects and directs rainwater |
|
Hip |
The point where the sloped sides meet |
Provides stability against winds |
|
Gable |
Triangular wall section at the roof end |
Creates attic space, supports ventilation |
|
Rake |
Edge of the roof on the gable end |
Protects the edge and provides a finished look |
Valleys form natural water channels where two roof planes meet at an interior angle. These areas handle water volume during storms, making proper construction essential to prevent leaks. Valley flashing becomes critical in these locations.
Hip roofs feature all sides sloping toward the walls, creating excellent wind resistance. This design performs well in hurricane-prone areas because it lacks flat surfaces that catch wind. The aerodynamic shape also sheds water and snow effectively.
Gables create the classic triangular wall sections at roof ends. These areas provide space for attic ventilation through gable vents and offer opportunities for architectural details like decorative trim.
Pro Tip: Hip roofs cost more to build than gable roofs but offer superior performance in severe weather areas. The extra cost often pays off through lower insurance premiums and reduced storm damage.
Dormers project vertically from sloped roofs, adding interior space and bringing natural light into attic areas. These architectural features enhance curb appeal while creating functional living space, but they require careful flashing around their complex intersections.
Roof planes are the individual flat surfaces that make up your roof's overall shape. Simple roofs with fewer planes cost less to build and maintain, while complex designs with multiple planes create striking visual interest but need more extensive flashing systems. Each plane intersection represents a potential leak point that requires proper waterproofing attention.
Best for: Simple roof planes work well for budget-conscious homeowners, while multiple planes suit those prioritizing architectural interest over maintenance simplicity.
Understanding your roof's components makes the difference between smart maintenance decisions and costly mistakes. When you know how each part works within the system, you can prioritize repairs effectively and extend your roof's lifespan. This knowledge also prevents contractors from recommending unnecessary work or helps you spot when legitimate repairs are being overlooked.
Different roof components fail at different rates, which should guide your repair priorities and budget planning:
|
Component |
Typical Issues |
Repair Priority |
|---|---|---|
|
Decking/Sheathing |
Rot, warping |
High |
|
Underlayment |
Moisture penetration |
Medium |
|
Flashing |
Rusting, separation |
High |
|
Ventilation |
Insufficient airflow |
Medium |
|
Gutters |
Clogging, separation |
Medium-High |
Flashing problems around chimneys, valleys, and dormers should get immediate attention because these areas cause the most expensive damage when they fail. A $200 to $500 flashing repair can prevent thousands in structural damage to your roof deck and interior.
Pro Tip: Check your flashing first after severe storms. These vulnerable areas fail before other roof components and create the most costly problems if ignored.
Roofing contractors respond better to homeowners who understand basic roof terminology. When you can describe problems accurately and ask informed questions, you'll receive more precise quotes and better service.
Before meeting with contractors, prepare to:
Contractors appreciate clients who can distinguish between structural issues (rafters, decking), waterproofing problems (underlayment, flashing), and surface concerns (shingles, tiles). This specificity helps them diagnose problems faster and prevents misunderstandings about necessary repairs.
Understanding your roof's components enables you to make informed maintenance decisions and communicate more effectively with contractors. Each part serves a specific purpose, ranging from structural support to water management. Understanding these roles helps you prioritize repairs and identify problems early.
Regular inspection of critical areas, such as flashing, gutters, and ventilation components, prevents small issues from escalating into expensive structural damage. When you can identify whether problems involve rafters, decking, or just surface materials, you'll get more accurate repair estimates and avoid unnecessary work.
This knowledge also helps you ask the right questions during contractor consultations and understand their recommendations. You'll recognize when repair suggestions align with industry standards and when you might need a second opinion.
Make roof component inspection part of your regular home maintenance routine. Check flashing around chimneys and valleys after storms, ensure gutters drain properly, and verify that ventilation systems remain unobstructed. These simple steps can extend your roof's lifespan and save thousands in premature replacement costs.
Understanding your roof's anatomy helps you make informed maintenance decisions and communicate effectively with contractors, potentially saving thousands on unnecessary repairs.
Different roof components deteriorate at varying rates, making it essential to prioritize repairs based on their impact on the entire system rather than addressing issues in isolation.
GET THE ESSENCE OF RELEVANT HOME
IMPROVEMENT TOPICS IN LESS THAN 5 MINUTES

Standing Seam Metal Roof: Smart Buyer's Guide for Homeowners
Standing seam metal roofs cost between $7.54 and $39.43 per square foot, making them a significan...

A Jack and Jill bathroom is a full bathroom that connects two separate bedrooms through individua...

Thanks for joining our homeowners’ community.
Stay tuned!
Choose the category
Choose the category