Wood Flooring Types: Expert Guide to Choosing the Perfect...
Homeowners and prospective buyers still prefer wood flooring over other options. These classic fl...

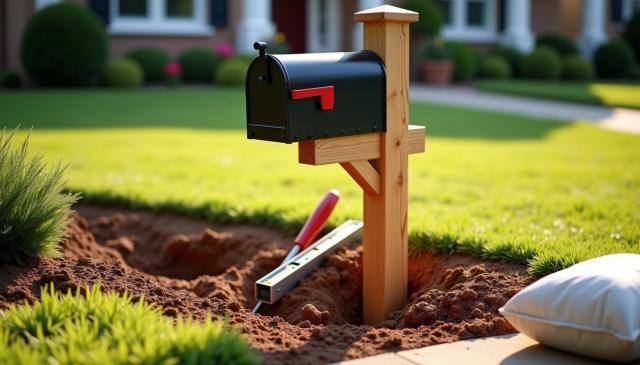
A properly installed mailbox post can last over 20 years, while a poorly installed one might need replacement within a year. Installing a mailbox post correctly is a straightforward DIY project that saves you $150-$300 in professional installation costs while ensuring reliable mail delivery and enhanced curb appeal. Both concrete and non-concrete installation methods provide excellent results when you follow proper depth guidelines and ensure correct alignment. Concrete offers maximum stability for long-term installations, while non-concrete methods allow easier future replacement. The choice depends on your soil conditions, climate, and maintenance preferences. This guide covers step-by-step instructions, important regulations, and expert tips to help you complete this weekend project successfully. Make sure you understand USPS requirements and local guidelines before starting to avoid costly reinstallation later.
Understanding mailbox installation regulations before you begin saves you from costly reinstallation later. Proper planning ensures your mailbox meets all requirements while serving your needs effectively.
The United States Postal Service maintains specific guidelines for residential mailboxes to ensure efficient mail delivery. Failing to meet these standards can result in delivery issues or require complete reinstallation.
Height and placement requirements:
|
Requirement |
Measurement |
Notes |
|---|---|---|
|
Height from the ground to the bottom of the mailbox |
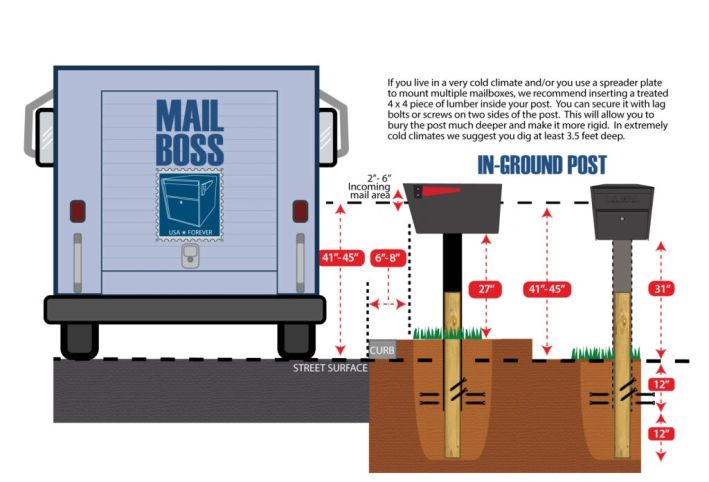
41-45 inches |
Measured from the road surface |
|
Distance from the curb to the mailbox face |
6-8 inches |
Ensures the carrier can reach without exiting the vehicle |
|
Post depth in the ground |
Minimum 24 inches |
Deeper installation recommended in loose soil |
Your mailbox must display your house number with minimum 1-inch tall numbers and be positioned on the same side of the road as other mailboxes in your neighborhood. For rural areas without established patterns, install on the right-hand side of the road in the direction of the carrier's route.
Pro Tip: Contact your local postmaster before installation to confirm specific requirements for your area, particularly if you live in a region with heavy snowfall where additional height clearance might be necessary.
Many municipalities require permits for installing new mailboxes, particularly when creating a new mail delivery point. Homeowners' associations often have strict guidelines regarding:
Check with your local building department about setback requirements from the road before proceeding. This is especially important near intersections where visibility concerns might restrict placement options.
Take photos of compliant mailboxes in your neighborhood before purchasing materials. This visual reference helps ensure your installation meets local aesthetic standards.
Selecting the optimal spot for your mailbox requires striking a balance between regulations and practical considerations.
Consider safety factors first. Position your mailbox where:
Evaluate soil conditions next. Areas with poor drainage may require additional reinforcement to prevent leaning. Rocky soil might necessitate specialized digging tools.
Visibility matters for successful mail delivery. Position your mailbox where:
Consider convenience for your daily use. Place your mailbox where you can easily access it from your driveway or walkway, particularly during inclement weather.
For areas with heavy snowfall, position your mailbox so it remains accessible after snow removal operations. Consider installing slightly farther from the road than the minimum requirement to reduce damage from snow plows.
Selecting the right materials and tools significantly impacts both the installation difficulty and long-term durability. Your post material selection impacts maintenance requirements and lifespan, while proper tools ensure professional-quality results.
Each post material offers different advantages based on your climate, budget, and maintenance preferences. Consider these factors when selecting your post material.
|
Post Material |
Durability |
Cost Range |
Best For |
|---|---|---|---|
|
Pressure-treated wood |
7-10 years |
$15-$30 |
DIY customization, rural settings |
|
Cedar/redwood |
10-15 years |
$25-$45 |
Natural look, insect resistance |
|
Metal (steel/aluminum) |
15-20+ years |
$30-$100 |
Maximum durability, modern appearance |
|
Vinyl/PVC |
15-20 years |
$40-$80 |
Zero maintenance, consistent appearance |
|
Stone/brick |
20+ years |
$75-$200+ |
Premium look, maximum stability |
Climate considerations affect material performance significantly. Metal posts may rust in coastal areas unless properly coated, while pressure-treated wood can warp in extremely wet conditions. Vinyl posts offer excellent weather resistance but may become brittle in very cold climates.
Pro Tip: Consider a swing-away post design in areas with snowplows. These posts pivot when struck, preventing damage and costly replacement.
Gathering all necessary tools before starting prevents frustrating delays during the installation process.
Basic tools needed for all methods:
Additional tools for concrete installation:
Pro Tip: Rent a powered auger for $50-75 per day if digging in rocky or clay-heavy soil. This investment saves hours of difficult manual labor.
Weatherproofing materials improve longevity considerably. Place 4-6 inches of gravel at the bottom of your post hole to improve drainage and prevent water accumulation that causes premature rotting or corrosion.
Wood posts benefit from pre-installation treatment with wood preservative or exterior-grade paint. Treat all cut ends with wood sealer to prevent moisture penetration.
Use galvanized or stainless steel screws and brackets to prevent rust stains and premature hardware failure. This upgrade prevents unsightly deterioration and extends the life of the hardware.
Pro Tip: Wrap the underground portion of your post with tar paper or apply a rubberized coating in areas with freeze-thaw cycles. This moisture barrier prevents frost heave—the process where freezing ground pushes posts upward over time.
A concrete collar (wider section at the concrete top) creates a sloped surface that directs water away from the post, reducing rot risk by up to 40% compared to standard installations.
Two main approaches work for mailbox post installation: concrete for maximum stability and non-concrete methods for easier replacement. Your choice depends on soil conditions, weather patterns, and how permanent you want the installation.
Concrete provides unmatched stability, making it ideal for areas with extreme weather. Dig a hole at least 24 inches deep and about 3 times the width of your post (typically 8-10 inches in diameter).
The installation process includes:
Brace your post temporarily to hold it vertical during the 24-48 hour curing process. Weather conditions affect curing time, so plan accordingly.
Non-concrete methods offer quicker installation and easier future replacement. The most common approaches include:
|
Method |
Description |
Best For |
|---|---|---|
|
Post spike |
Metal bracket driven into the ground |
Sandy/loamy soil, temporary installations |
|
Crushed gravel |
Post set in a hole filled with tamped gravel |
Good drainage areas, moderate climates |
|
Direct burial |
Post placed in a hole with packed soil |
Rural areas, simple installations |
For gravel installation, dig the same size hole as concrete but fill with 4-inch layers of gravel, tamping each layer firmly. This provides drainage while maintaining a reasonable level of stability.
Treat wooden posts with ground-contact wood preservative before installation to prevent premature rotting.
|
Factor |
Concrete Installation |
Non-Concrete Installation |
|---|---|---|
|
Durability |
15-20+ years |
5-10 years typically |
|
Installation time |
1-2 hours plus curing |
30-60 minutes total |
|
Weather resistance |
Excellent in high winds |
May lean in wet conditions |
|
Cost |
$15-20 more for materials |
Less expensive initially |
|
Replacement |
Requires breaking concrete |
Easy removal and adjustment |
|
Adjustability |
None after concrete sets |
Can adjust if needed |
Concrete installations may crack in freeze-thaw cycles due to ground movement but remain the standard for maximum stability. Non-concrete methods allow easier replacement but require more frequent alignment checks.

Mark your chosen location with stakes and string. For standard installations, dig a hole that provides adequate stability and meets postal requirements:
|
Measurement |
Recommended Size |
Purpose |
|---|---|---|
|
Depth |
24-36 inches |
Provides stability, reaches below the frost line |
|
Width |
8-12 inches (3x post width) |
Allows room for concrete or gravel support |
|
Clearance |
41-45 inches above ground |
Ensures proper mailbox height when complete |
Use a post hole digger or power auger to create a clean, vertical hole. Areas with rocky soil require a digging bar to break through difficult spots.
Pro Tip: Call 811 before digging to have underground utilities marked. This free service prevents accidentally cutting into gas or electric lines.
Add 4-6 inches of gravel at the bottom of your hole for drainage. This layer prevents water pooling that causes premature rotting or frost heaving.
Place your post in the center of the hole and check vertical alignment using a level on two adjacent sides. The post should face square to the road for proper mailbox positioning.
For concrete installation:
For installation without concrete, backfill with 4-inch layers of gravel or soil, tamping firmly between each layer using a post tamper or 2x4 end.
Wait 24 hours if using concrete before mounting the mailbox. Follow the manufacturer's instructions, which typically include:
Verify that your installation meets all requirements:
Make any necessary adjustments before the concrete fully cures, if applicable.
Regular maintenance keeps your mailbox post functional and attractive for years after installation. The specific care requirements depend on your post material and local weather conditions.
Protecting your post from weather damage significantly extends its lifespan. Different materials require different maintenance approaches to prevent deterioration.
|
Post Material |
Weatherproofing Method |
Application Frequency |
|---|---|---|
|
Wood |
Clear sealant or exterior paint |
Annually |
|
Metal |
Rust-inhibiting paint |
Every 2-3 years |
|
Vinyl |
Gentle cleaning with soap |
Twice yearly |
Apply waterproof sealant to wooden posts annually, focusing on areas where water collects. Metal posts need regular inspection for rust spots and touch-up paint as needed.
Pro Tip: Apply a rubber gasket between the mailbox and mounting board to prevent water intrusion that can cause wood rot or metal corrosion.
Check your post quarterly for signs of movement, especially after severe weather or seasonal ground changes. Posts installed without concrete need more frequent inspection after heavy rains or freeze-thaw cycles.
Stabilize leaning posts by adding compacted soil or gravel around the base. Wooden braces can temporarily support a leaning post until you can make permanent repairs. Keep lumber scraps available for quick fixes when needed.
Replace your mailbox post when you notice these warning signs:
Minor damage can often be repaired with wood fillers, metal patches, or additional support brackets. Consider your post material when choosing repair methods to ensure compatibility and effectiveness.
Installing a mailbox post correctly saves money while ensuring reliable mail delivery for years to come. This DIY project requires proper planning, the right materials, and attention to detail throughout the process. Check USPS regulations and local requirements before starting to avoid reinstallation later.
Your choice between concrete and non-concrete installation methods impacts durability and maintenance needs. Concrete offers maximum stability lasting 15-20+ years, though replacement becomes more difficult. Non-concrete methods provide easier replacement but typically last only 5-10 years.
Regular maintenance extends your mailbox post's lifespan considerably. Wooden posts benefit from annual waterproof sealant application, while metal posts need rust-inhibiting paint every few years. Quarterly inspections help catch and address any leaning or shifting early.
Proper installation depth (at least 24 inches) and correct height (41-45 inches from ground to mailbox bottom) ensure your mailbox meets postal requirements. Taking time to install your mailbox post correctly now prevents problems later and enhances your home's curb appeal for years to come.
GET THE ESSENCE OF RELEVANT HOME
IMPROVEMENT TOPICS IN LESS THAN 5 MINUTES

Wood Flooring Types: Expert Guide to Choosing the Perfect...
Homeowners and prospective buyers still prefer wood flooring over other options. These classic fl...

Floating decks sit directly on the ground without permanent footings or foundations, making them...

Thanks for joining our homeowners’ community.
Stay tuned!
Choose the category
Choose the category