
Interior vs Exterior Transom Windows: Design & Function
Decorative windows placed above a door or another window originally served as functional ventilat...

Proper maintenance of a wood deck is essential, as a neglected deck can reduce your home’s value by 5–10% annually. Most homeowners understand that a deck requires maintenance every 2–3 years; however, many postpone the task because they believe they must completely remove the old finish first. In reality, you do not necessarily need to strip the wood if the current finish is still in good condition. By using the proper preparation techniques, you can apply a new stain over the old layer and achieve a long-lasting result without the labor-intensive removal process. Restaining is often the simplest way to renew a deck's appearance and extend its lifespan. Properly cleaning the wood, lightly sanding where necessary, and selecting the correct product will significantly increase the effectiveness of the staining process. This article covers every step of the project, from identifying when your deck needs a simple restain versus a complete refinish, to selecting a compatible product and applying it correctly. We will also explain when to use the "stain-over-stain" method and when complete stripping is necessary. Additionally, you will learn which tools ensure the smoothest application and which maintenance methods will best increase your deck's longevity. This guide provides a straightforward, one-weekend solution to restoring both the beauty and the protection of your deck.
Knowing how often to restain your deck, and determining if you may simply add a new coat of stain over your old finish, will save you from a lot of wasted time and money. The two are the most important determinants for what you do prior to doing anything with your deck.
Your current stain conditions will dictate your timing for a restaining process. Start by conducting a simple water test. Take a small amount of water and pour it into a heavily trafficked area of your deck. If the water soaks in right away (as opposed to forming droplets), your stain is no longer protecting your wood, and you need to restain. If the water forms droplets, then your stain is still providing sufficient protection.
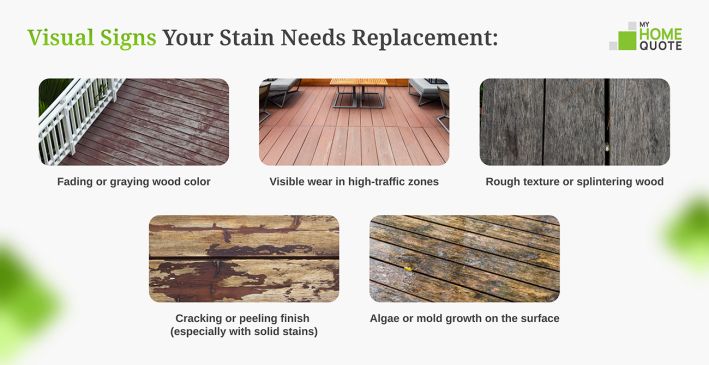
Visual Signs Your Stain Needs Replacement:
Whether you can skip stripping depends on your current finish and the new stain you plan to use. Their compatibility determines your next steps:
|
Current Finish |
Can Apply Semi-Transparent |
Can Apply Solid Stain |
|---|---|---|
|
Semi-Transparent |
Yes |
Yes |
|
Solid Stain |
No |
Yes |
|
Paint |
No |
Yes |
|
Clear Stain/Sealer |
Yes |
Yes |
A semi-transparent stain will function as intended if it has penetrated the wood. Solid stains form a protective layer on the wood's surface, blocking the stain's penetration. When a semi-transparent stain is applied over a solid stain, it will usually have poor adhesion and eventually peel off the wood.
Solid stains are the best choice for restaining projects because they can be used with almost all existing finishes (stain, paint, etc.) and are a good way to hide any imperfections on an older deck or mixed wood type. However, solid stains tend to crack and peel sooner than semi-transparent stains.
Determine how much of the old finish needs to be removed from your deck before staining. If there is extensive peeling, cracking, or bubbling of the existing finish, remove the old finish before staining, regardless of whether the new stain can be applied over the existing finish to achieve a good result.
It is how you prepare that will determine if you have success with your restaining project, or failure. Not taking the time to complete each step of the process may guarantee your staining job does not meet your expectations; however, completing each step of the preparation process will create a strong base to achieve a professional looking finish.
Begin by removing all items off of your deck including outdoor furniture, flower pots, grill and/or other decorative items. Once removed sweep the entire area thoroughly, and then remove the loose debris that can become lodged in the gaps between the decking boards using a shop vac.
Essential Cleaning Tools
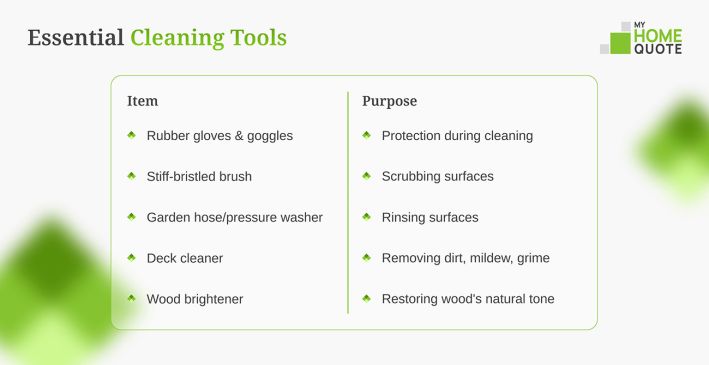 First, wet the entire deck. Apply a deck cleaner and let it sit for 15–20 minutes, adding more as needed to keep the surface damp; do not allow it to dry.
Next, use a long-handled brush to scrub the area thoroughly. Then, rinse off the remaining cleaner using a garden hose or a low-pressure power washer.
For stubborn spots or wood graying, apply a wood brightener after cleaning. This oxalic acid solution restores the wood's natural color and removes deep stains that persist even after a standard cleaning.
You need to allow your deck time to fully dry before applying a finish, which typically takes 48 to 72 hours, depending on current weather conditions. Look at the weather forecast so that you know whether it will rain while your deck is in the process of drying.
After your deck has dried, visually inspect your deck for:
Orbital sanders are significantly faster than hand-sanding for those problem spots. When sanding, "blend" the edges of the sanded area to create a transition into the surrounding wood. Once you have applied your stain, this will help eliminate harsh lines created by lighter and darker areas.
Use plastic sheeting to tape off your house's siding and plants before you begin to stain.
The equipment and stain you choose will affect how your deck looks at completion and how often you'll need to maintain it. Knowing what works best for the job of staining a deck will help you determine if you'll have to redo the deck in two years or five years.
Stain applicators can also affect application speed, coverage rate, finish quality, and ease of use. Below is a chart showing the best stains and applicators for different stain types and applications, especially for staining decks that are already stained.
Keep your applicator pad consistently wet by dipping it frequently in stain to maintain a "wet edge" throughout application, preventing lap marks and uneven coloration.
For a long time, oil-based stains were the go-to for many decking contractors because they penetrated the wood well and provided a deep, rich color that would last for years. More recently, however, there has been increased interest in using water-based stains, primarily due to their environmental friendliness and ease of cleanup.
When choosing which type of stain to use on a project, it's crucial to understand the characteristics of each type so that the correct one may be selected based on the specific needs of your deck staining project:
Oil-based stains tend to penetrate much deeper into the wood grain, providing a deeper, richer color than water-based stains. Oil-based stains also take longer to dry (usually 24-48 hours) and require mineral spirits for cleaning. Water-based stains dry significantly faster (usually 2-6 hours), can be cleaned up with soap and water, and contain fewer VOCs (volatile organic compounds). The primary drawback to water-based stains is that they don't penetrate as far into the wood fibers and, therefore, may require more maintenance to keep the stain looking its best.
Whether you achieve successful results from your deck restaining project depends on how properly you apply the appropriate techniques to your deck's surface. There are many ways to learn proper restoration of your deck surface; however, it all starts with paying attention to the details and using the correct method to provide long-lasting protection.
Before applying a new stain, determine whether your deck will require light sanding of the existing surface. Most deck restaining jobs where the previous finish has been left intact can be finished with just spot-sanding the areas that appear to have a blemish.
When to sand areas of your deck:
If several areas need correction with an orbital sander and 40-60 grit sandpaper, it will help remove surface imperfections. Once the sanding is complete, use a touch-up brush to "feather" the sanded areas so they transition smoothly into the adjacent unsanded area, creating a smooth, even appearance when the deck is stained.
Using a hammer to tap along the deck surface, locate any exposed or protruding nails or screws and reset them below the wood surface using a nail set or punch before beginning to stain the deck to prevent the stain applicator from getting caught in the exposed nail or screw head.
Before starting with the application, put on your protective gear (glasses or goggles, gloves, and old clothes). Apply the stain to the open ends of the boards first, and do two or three boards at a time so you always have an area of stain that is wet as you continue through this process.
|
Tool |
Best For |
Application Technique |
|---|---|---|
|
Natural Bristle Brush |
Detail work, railings, spindles |
Apply with grain, use for back-brushing |
|
Stain Pad |
Large flat surfaces |
Keep consistently wet, work in manageable sections |
|
Sprayer |
Large areas, posts |
Follow with back-brushing for better penetration |
No matter the primary application type, back-brushing is necessary. Use a large brush to go with the grain after you apply the initial layer of stain. This will get the stain deep into the wood and give it a smooth, even coat.
Wait until the first coat has dried as recommended by the product manufacturer (usually 2 to 6 hours with water-based finishes and 24 to 48 hours with oil-based finishes). Be sure that the weather forecast indicates that the deck will be completely dry during this time frame.
Typically, porous decking materials require an additional coat. In many cases, it is best to apply a second coat to your decking material before the first coat is completely dry. Always work in small sections, finish each section completely before moving on to the next, and do not "break" in the middle of a board.
After you have completed all of the staining, wait until the decking material has cured completely before placing back any furniture:
Your patience will be rewarded with a smoothly finished stained deck that sheds water properly with no puddles or marks.
If you wonder how to restain a deck without stripping, the following information is for your consideration. This method works best on decks that are already in good shape, but you need to choose stains that stick and cover properly.
Your current deck finish will determine whether you can apply a new stain directly over it. Please refer to the following compatibility chart to ensure the correct decision is made.
|
Current Finish |
Can Apply Over Without Stripping |
|---|---|
|
Semi-transparent |
Another semi-transparent (darker shade) |
|
Semi-transparent |
Solid stain |
|
Solid stain |
Another solid stain |
|
Solid stain |
Semi-transparent (NOT recommended) |
|
Clear sealer |
Any stain type |
If you are planning to restain your deck with an existing finish, choose a stain that is 1 to 2 shades darker than your original finish. By choosing a darker finish, you will ensure even coverage and help mask any color variation from your original finish.
When applying a stain to your deck there are three steps involved:
Certain deck conditions require the complete removal of the old finish before restaining:
If the old finish won’t let the new stain stick or soak in, you’ll need to remove it first to get good results. In these cases, a guide on how to stain an old deck can help you prepare the surface and get a long-lasting finish.
Proper upkeep of a surface after it has been refinished will increase your return on your investment and allow you to go longer between major refinishing projects. Regular cleaning and recoating can make a big difference in how long your deck lasts (i.e., 5 or 10 years) compared to having to refinish it each year.
You need to perform some regular maintenance to keep your new stained deck looking good and protected from the elements. The suggested maintenance schedule is as follows:

Using a pressure washer will allow you to clean faster; however, improper use can damage your deck's surface. Always start by using the lowest adequate pressure that will still achieve your cleaning objective, using a 25-degree tip, and maintaining the nozzle at least 12 inches away from all wood surfaces. Consistent movement with the nozzle will help to prevent gouges in the surface of your deck. Additionally, it is best to spray downward or horizontally toward vertical surfaces, as spraying upward toward them can push water behind any trim or molding, which can lead to mold growth. It is also essential to properly use a pressure washer on a stained deck, as excessive pressure can prematurely remove the stain.
Entrances, stairs, and areas around furniture wear faster than other deck sections. These spots can receive touch-up coats without redoing the entire deck. Check these areas every 6 months, applying fresh stain as needed after cleaning. This targeted approach prevents extensive damage while maintaining consistent protection across your entire deck surface.
Understanding the time and money investment for deck restaining helps you plan your project and select materials that deliver lasting value. These factors directly impact your budget and long-term home maintenance costs.
Deck restaining time varies based on size and condition:
|
Deck Size |
Preparation |
Application |
Total Time |
|---|---|---|---|
|
Small (200 sq ft) |
1 day |
4-6 hours |
2-3 days |
|
Medium (400 sq ft) |
1-2 days |
8-10 hours |
3-4 days |
|
Large (600+ sq ft) |
2-3 days |
12+ hours |
4-5 days |
These estimates include proper drying time between preparation and application. Your deck must be completely dry for at least 3 days before starting and remain dry for 24 hours after application.
Project costs depend on materials and deck condition:
|
Component |
Cost Range |
|---|---|
|
Stain |
$25-$50 per gallon (covers ~200-300 sq ft) |
|
Cleaner |
$15-$25 per gallon |
|
Tools |
$50-$100 (one-time investment) |
|
Total |
$0.75-$2.50 per square foot |
Using rented equipment (such as a pressure washer or sander) can be less expensive ($50 - $75 per day) and may be a better option than investing in the product for one job.
High-quality products are 30-50% more expensive to purchase at the time of use but offer better long-term benefits and value. Premium-quality products will feature stronger materials and more UV inhibitors. These types of products generally last between three and five years, whereas low-cost products usually last from one to two years. This results in lower annual maintenance costs and fewer applications for you.
Restaining your deck rather than removing it provides an alternative for maintaining it during certain times of the year. The method has the greatest potential when your current stain coating is compatible with the new product and your present finish is otherwise intact.
Proper preparation and choosing suitable stain products are the keys to success. Adequate cleaning, allowing sufficient time to dry, and using the correct equipment all contribute to achieving professional-looking results rather than a project that may have to be redone. Semi-transparent stains can be applied over other semi-transparent coatings, while solid stains generally cover most of the previous finish(es).
Ongoing upkeep will help extend the life of your newly coated deck. Check the heavily used sections of your deck every six (6) months and check the water test annually to see if additional coats will be necessary. Performing a maintenance coat every one to two (1 – 2) years will prevent you from needing to refinish your entire deck more often than necessary.
Do not rush through the steps; ensure that there is sufficient time for the previous steps to completely dry before proceeding to the next. Weather plays a significant role; it is essential to plan your project with forty-eight to seventy-two (48 – 72) hours of dry weather for preparation and twenty-four (24) hours of dry weather for the finishing stages.
When deciding whether to remove the existing finish and apply a new one or use a new finish over the existing one, consider your individual circumstances. If you are experiencing excessive finish peeling, attempting to lighten the deck color substantially, or applying a semi-transparent finish over a solid finish, the existing finish should be removed before using the new finish.

The lion's share of the house remodeling cost should go for roof restoration

Homeowners should keep a close eye on their window efficiency

Going solar should be an ultimate part of any major home renovation project

Install an advanced HVAC system to improve your home's air quality

Add to your house value by updating the look and functionality of your bathroom

Consider a kitchen remodeling to make it more welcoming and comfortable

Keep the gutter system in mint condition to prevent any damage to the integrity of your home.

Install new flooring to enhance your home's appearance and add extra value to it

Replace the exterior siding to spruce up your home's curb appeal and increase its sale value

Equip your home with a walk-in tub to enjoy improved safety while taking a bath
GET THE ESSENCE OF RELEVANT HOME
IMPROVEMENT TOPICS IN LESS THAN 5 MINUTES
Interior vs Exterior Transom Windows: Design & Function
Decorative windows placed above a door or another window originally served as functional ventilat...

Screen doors provide many households with a way to keep a house open for fresh air while preventi...

Thanks for joining our homeowners’ community.
Stay tuned!
Choose the category
Choose the category