Installing a Dishwasher Made Easy: A No-Fail Guide for Ho...
Installing a dishwasher yourself can save you between $200 and $500 in professional installation...

Building a deck offers one of the most effective ways to expand your outdoor living space, boost your home's value, and create an area for relaxation or entertaining. Professional-quality results depend on careful planning and precise execution throughout every phase of construction. For homeowners researching how to build a deck, understanding the process before starting ensures better results. Your deck must meet specific structural requirements to ensure safety and durability. All decks need to support a live load of 40 lbs. per square foot and a dead load of 15 lbs. per square foot. You'll also need the right materials—Southern Pine, Grade #2 or better pressure-treated lumber paired with galvanized hardware featuring G-185 coating or stainless steel fasteners. Foundation work requires equal attention to detail. Footings typically range from 12 to 48 inches deep, depending on your area's frost line. Post holes should extend at least 2 feet deep and be set in concrete for adequate support. Whether you plan to build a deck yourself or hire a contractor, these standards are essential. This guide covers every step of the deck-building process, from pouring concrete piers and setting beams to installing joists and framing stairs. You'll learn the techniques needed to create a durable, attractive outdoor space that serves your family for years to come.
Proper planning saves time, money, and headaches before you start construction. A well-designed deck creates an outdoor retreat that complements your home's architecture and serves your family's needs for years.
Determining how you'll use your deck guides every major decision about size, location, and features. Different purposes require different design approaches:
|
Deck Purpose |
Design Considerations |
|---|---|
|
Dining |
Position near the kitchen; allow space for chair movement; consider grill placement |
|
Relaxation |
Include room for lounge chairs; plan for shade elements; add built-in seating |
|
Entertainment |
Design multi-level zones for different activities; plan uninterrupted open areas |
|
Pool/Hot Tub |
Ensure structural support for weight; check fencing requirements |
Best for multiple uses: Consider a multi-level deck with different zones for dining, lounging, and entertaining. Varied decking colors can help visually separate these areas.
Start by measuring your available space and creating a detailed sketch. Drive wooden stakes (18-24 inches tall) at each corner of your planned deck area, then tie mason's twine between them to outline the perimeter.
Use the 3-4-5 rule for perfectly square corners: measure 3 feet along one string from the corner, 4 feet along the perpendicular string, then adjust until the diagonal measurement between these points equals exactly 5 feet.
Consider these practical layout factors:
Your deck can connect directly to your home or stand independently. Each option offers distinct advantages:
Attached deck (ledgered) connects to your house using a ledger board for support, creating seamless indoor-outdoor flow. This type works well when you want direct access from interior rooms.
Freestanding deck (floating) remains structurally independent from your home, supported entirely by posts. These decks offer greater placement flexibility, won't damage your home's exterior if storm-damaged, and generally require less skill for DIY deck building.
Best for beginners: Freestanding decks eliminate the complexity of properly attaching ledger boards to existing structures.
Most deck projects require permits, regardless of height above grade. Before starting construction, you need to:
Permit applications typically require:
Most jurisdictions require multiple inspections throughout the building process, including footing, framing, and final inspections. Properly prepared permit applications typically process within 10-15 business days.
A solid foundation determines the success of your entire deck project. Without proper footings, even a perfectly designed deck will fail when the ground shifts beneath it. Your footings distribute the deck's weight evenly across the soil, preventing settling and maintaining structural integrity for decades.
Several footing options exist, each suited for different conditions and deck requirements:
|
Footing Type |
Best For |
Cost Range |
Installation Time |
Weight Capacity |
|---|---|---|---|---|
|
Poured Concrete |
Most standard decks |
$15-30 per footing |
2-3 days (with curing) |
Highest |
|
Concrete Piers/Blocks |
Smaller, lighter decks |
$8-15 per footing |
Same day |
Limited |
|
Helical Piles |
Difficult terrain, soft soil |
$75-150 per pile |
1-2 hours per pile |
High |
Poured concrete footings remain the most popular choice, typically measuring 8–24 inches in diameter, with 12-inch diameter being most common. These footings transfer deck loads directly to solid ground below the frost line. If you’re learning how to build a deck, start by confirming your local frost line depth and sizing footings accordingly.
Best for: Most residential decks requiring long-term stability and maximum load capacity.
Concrete piers work well for lightweight decks but offer limited weight capacity compared to poured footings. Helical piles provide excellent solutions for challenging soil conditions but require specialized equipment for installation.
Proper footing installation requires precise execution. If you're learning how to build a deck, confirm your footing layout and measurements before digging. Here's what you need to do:
Once holes are prepared, place cardboard forms and pour concrete. Fill the tube with concrete, tamping when half-full to remove air pockets and ensure a firmer structure. Position post brackets while concrete remains workable, ensuring they're level and aligned with your deck layout.
The frost line varies dramatically across regions. Northern states like Minnesota may require digging 8 feet deep or more, while southern Florida has virtually no frost concerns. This depth represents the maximum point where soil freezes during winter.
Frost heave occurs when freezing water expands and pushes upward with tremendous force. This pressure can lift footings—and your entire deck—several inches, causing structural damage. Always consult your local building department for precise frost depth requirements. Dig 3-4 inches deeper than the specified frost line for extra protection against extreme weather events, especially when building a deck intended to last for decades.
Cardboard tubes (sonotubes) create consistent, properly shaped footings. These forms should extend at least 4 inches above ground level to keep posts away from soil contact.
Rebar reinforcement significantly improves footing strength, though it's not always required by code. Using rebar within deck footings provides an inexpensive way to increase performance and stability. This becomes particularly important for decks supporting heavy loads or built on challenging soil conditions.
Place vertical rebar pieces inside forms before pouring concrete, securing them with wire ties to maintain proper spacing. This creates a steel cage that dramatically improves resistance to cracking and ground movement.

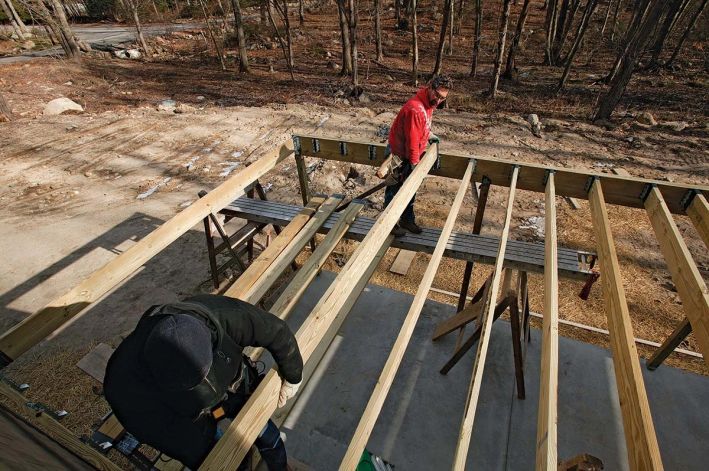
The ledger board connects your deck to your house, supporting one end of the joists and providing structural stiffness. For proper installation:
Pro Tip: Ensure the top of your ledger is lower than your desired deck height by the thickness of one decking board plus flashing (typically 1⅛ inches).
Beams transfer deck loads to support posts and must be sized appropriately for your deck's span and load requirements. Post-to-beam connections must be code-compliant, with beams fully supported by posts. Approved connection methods include:
|
Connection Type |
Post Size |
Hardware Required |
|---|---|---|
|
Double beam on post |
4x4 |
AC4Z connector front, LPC4Z connector back |
|
Double beam on post |
6x6 |
AC6Z connector front, LPC6Z connector back |
|
Notched post |
6x6 |
½"x7" hot-dipped galvanized bolts |
Check that posts are plumb in both directions using a post level. Framing correctly at this stage is one of the most important parts of building a deck that lasts.
Joists should be spaced 16" on center for standard installations or 12" on center for diagonal decking applications. Check that:
Joists must be positively attached to the ledger with joist hangers providing a minimum 1.5" bearing. Secure joists to beams with hurricane ties to resist uplift forces.
Hurricane ties are relatively inexpensive hardware pieces that connect joists to beams. They're especially important in areas prone to high winds. Options include:
Match the corrosion resistance of fasteners to hardware—galvanized with galvanized, stainless with stainless.
Square your deck frame using the 3-4-5 method: measure 3 feet along one side, 4 feet along the perpendicular side, then adjust until the diagonal equals exactly 5 feet.
Verify your frame is level by:
The deck boards and railings represent the most visible elements of your project—the parts everyone will see and use daily. Your choices about materials, spacing, and fastening methods affect both appearance and how long your deck will last. For homeowners researching the best way to build a deck, material selection plays a huge role in performance and long-term value.
Wood and composite materials each offer distinct advantages for deck construction:
|
Material |
Cost |
Maintenance |
Lifespan |
Look |
|---|---|---|---|---|
|
Wood (Cedar, Redwood, Pine) |
$15-30/sq ft |
Annual staining/sealing |
15+ years |
Natural appearance |
|
Composite |
Higher initial cost |
Minimal (sweeping/washing) |
25-50 years |
Variegated colors, consistent |
Wood decking costs less upfront but requires about $451 annually for maintenance over its lifetime. Composite decking pays for itself within 2-3 years through reduced maintenance costs.
Pro Tip: For curved deck sections, composite decking can be heated and bent more easily than wood, offering greater design flexibility.
Proper board spacing prevents buckling and allows water drainage. For dry wood, maintain a 3/16" gap between boards. Install wet (freshly treated) wood with no gap since it will shrink naturally as it dries. If you’re following a guide on how to build a deck step by step, getting board spacing right is critical to long-term durability.
Start installation from the outside edge, working toward your house. This way, if you need to trim the final board, it's less noticeable against the wall.
Two primary fastening methods are available:
Deck screws: Economical option that's easily removable for repairs and provides better control against seasonal movement.
Hidden fasteners: Create a clean surface through clip systems (inserted between boards) or plug systems (countersunk screws with matching plugs). Hidden fasteners maintain consistent gap spacing as the clip thickness (3/16"-1/4") determines the spacing.
Secure posts firmly to the frame, ensuring they're plumb using a post level. Space balusters evenly with no openings larger than 4" apart.
Decks higher than 30" above grade must have guardrails at least 36" tall (42" in some states like California). The gap between balusters must not exceed 4", and the space between deck surface and bottom rail must be less than 4".
Rail posts must withstand a 200 lb. concentrated force applied anywhere along the top.
Your newly constructed deck needs proper finishing to stay beautiful and functional for years to come. The right protection enhances appearance while extending the lifespan of your investment by preventing moisture damage, UV deterioration, and structural wear. Good finishing techniques are an essential step in DIY deck building, helping you preserve both style and strength.
Proper deck preparation begins with thorough sanding. For standard wooden decks, start with 60-80 grit sandpaper for rough areas, then move to 120-150 grit for handrails and smoother surfaces. Sand along the wood grain direction—sanding against the grain can damage the wood. Vacuum thoroughly after sanding, as even small dust particles can prevent proper sealer adhesion.
Stairway lighting serves both safety and aesthetic purposes—IRC code R314.7 requires proper illumination. Recessed lights in risers provide safety and visual appeal after dark. Install low-voltage wiring from the farthest light back to the transformer, leaving a 6-inch wire loop at each fixture location. Match wire polarity correctly (smooth black wire to white lettered wire with ribbing) before securing connections with waterproof wire nuts.
|
Sealant Type |
Protection |
Lifespan |
Best For |
|---|---|---|---|
|
Clear Sealer |
Moisture only |
1 year |
Natural wood appearance |
|
Tinted Sealer |
Moisture + UV |
1-2 years |
Partial wood visibility |
|
Solid Stain |
Maximum protection |
3-5 years |
Color preference |
Apply sealant when temperatures stay between 50-90°F—never work in direct sunlight as the product dries too quickly. Work in 2-3 board sections at a time, applying thin, even coats rather than one thick application.
Northern climates may allow sealing every 2-3 years, but southern regions require annual application due to intense UV exposure. Before maintenance work, repair any loose boards, power wash the surface, then allow 24 hours for complete drying. Rearrange furniture periodically throughout the year to prevent uneven sun fading.
Best for: Homeowners who want to maximize their deck investment through proper protection and regular maintenance.
Deck construction involves multiple phases that work together to create a safe, durable outdoor space. Each step—from foundation work to final finishing—contributes to the overall quality and longevity of your project. If you’ve researched how to build a deck, you know that success comes from attention to detail at every stage.
Proper foundation work determines how well your deck performs over time. Footings that extend below the frost line and use reinforced concrete prevent the settling and shifting that can damage your structure. Your framing must be square and level, built with appropriately sized lumber to handle the loads your deck will experience.
Material choices affect both appearance and ongoing maintenance requirements. Wood decking costs less initially but requires annual maintenance, while composite materials offer longer lifespans with minimal upkeep. Proper installation techniques and code-compliant railings ensure your deck remains safe for family use.
The finishing work transforms your construction project into an outdoor living area. Quality sealing protects wood surfaces from weather damage, and thoughtful additions like lighting and built-in seating enhance both safety and enjoyment.
Your completed deck adds value to your home while creating space for relaxation and entertaining. Regular maintenance—cleaning, sealing, and occasional repairs—keeps your deck looking good and performing well for many years. With the right planning and effort, building a deck becomes an investment that rewards you for decades.
GET THE ESSENCE OF RELEVANT HOME
IMPROVEMENT TOPICS IN LESS THAN 5 MINUTES

Installing a Dishwasher Made Easy: A No-Fail Guide for Ho...
Installing a dishwasher yourself can save you between $200 and $500 in professional installation...

DIY kitchen island plans can add up to 30% more functional space to your kitchen while saving you...

Thanks for joining our homeowners’ community.
Stay tuned!
Choose the category
Choose the category