Bathroom Caulking Guide: Best Types and Application Tips
Cracked, peeling, or moldy bathtub caulk is a sign of trouble ahead. When caulk fails, water seep...

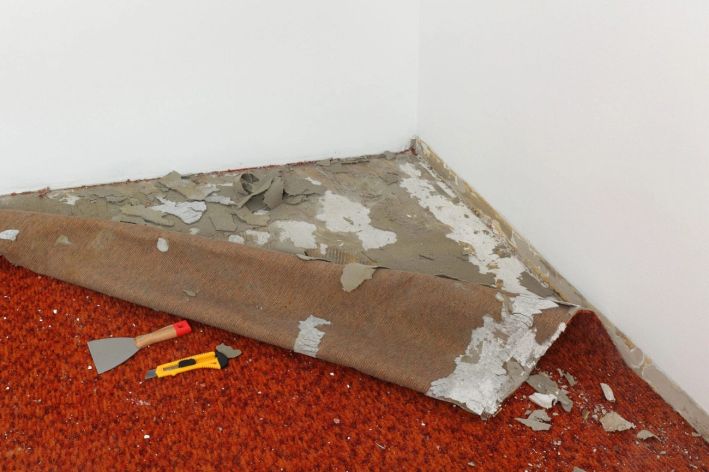
Removing old carpet flooring can transform a room and reveal the hidden potential of the surface beneath. Learning how to remove carpet gives homeowners the confidence to take on a project that improves both the look and value of their home. With careful planning and the right approach, this task can be manageable even for first-time DIYers. Successful carpet removal begins with preparation. Gathering essential tools—such as a utility knife, pry bar, staple remover, dust mask, and heavy-duty gloves—makes the work smoother and safer. Clearing the room of furniture, shutting off HVAC systems, and covering vents helps control dust and protects the rest of the house during the process. Once the space is ready, the step-by-step removal process can begin. Starting from a corner, cutting the carpet into manageable strips, lifting it away from tack strips, and dealing with padding or glued-down sections all require patience and the proper technique. After the main material is gone, careful disposal and thorough cleaning of the subfloor ensure a polished finish that’s ready for new flooring. This guide walks through each stage of carpet removal —from gathering tools to final cleanup—so homeowners can complete the job safely, stay on budget, and achieve professional-quality results without the need for costly contractors.
The right equipment speeds up the process and protects your subfloor from damage. These tools are affordable and available to more people at hardware stores, making it a perfect DIY project for homeowners.
A sharp utility knife helps cut carpet into sections you can handle. Pick a utility knife with replaceable blades because carpet fibers make blades dull quickly. You should keep extra blades handy to maintain sharp cuts throughout the project. Whether you plan to install new flooring or replace carpet later, a clean, precise cut will make the next step easier.
The pry bar (some call it a floor scraper) helps lift tack strips and remove tough staples. A good pry bar should have:
Pro Tip: Cut the carpet back in 3-4 foot sections with your utility knife before pulling it up. This creates pieces that are easier to roll up and throw away.
The subfloor will have many staples left after removing the carpet. A staple remover tool features a thin, flat edge that easily gets under staples to pull them out quickly. Regular pliers work in a pinch, but needle-nose pliers give you better control to grab tough staples without hurting your subfloor.
|
Tool |
Best Use |
Features to Look For |
|---|---|---|
|
Staple Remover |
Removing rows of staples efficiently |
Flat edge, ergonomic handle |
|
Needle-nose Pliers |
Extracting individual stubborn staples |
Long, thin tips for precision |
|
Regular Pliers |
General gripping and pulling |
Serrated jaws for better grip |
Carpet installers use hundreds of staples, so staple removal takes time. Having both tools ready makes this boring job easier to handle.
Removing carpet creates lots of dust, especially from old carpets full of dirt, skin cells, and allergens. An N95 or better dust mask keeps your lungs safe from these particles. Good work gloves protect your hands from:
Getting proper safety gear prevents injuries and breathing problems that could slow down your work or affect your health later. Whether you’re preparing for new flooring or replacing carpet, protective equipment is essential for a safe and efficient project.
A carpet stretcher (also known as a knee kicker) helps if you're:
Most people don’t need this special tool just for pulling up carpet. But if you plan to install new carpet afterward, spend $20–$30 to rent a carpet stretcher for a day. This tool provides the proper tension during installation, helping your carpet last longer without wrinkles.
These simple tools will give you everything needed to remove carpet smoothly. Professional installers might use more specialized equipment, but these core tools are enough to complete a DIY carpet removal project.
The right room preparation is a vital first step to removing carpet. Good preparation makes carpet removal easier and protects your home from damage and dust. Many people skip this step, but it substantially affects how well your project goes. Let's get into the essential steps you need before cutting and pulling.
You'll need to empty the room where you plan to remove the carpet. This has:
Moving heavy furniture to another room might not work. You can move everything to the room's center and cover it with plastic sheeting. This works great for bigger spaces where you remove carpet in sections.
|
Item Type |
Recommended Action |
Protection Needed |
|---|---|---|
|
Heavy furniture |
Move to the center or a different room |
Plastic sheeting, furniture sliders |
|
Electronics |
Remove completely |
None - store elsewhere |
|
Built-ins |
Cover really well |
Plastic sheeting, painter's tape |
|
Wall decor |
Remove from walls |
None - store elsewhere |
Pro Tip: Take photos of your room's layout before moving furniture. You'll have a reference to put items back in their original spots once your new flooring is in place.
Removing carpet creates lots of dust, especially when you have older carpets. Here's how to stop dust from spreading through your home:
Homes with central air need a new air filter after the carpet removal project. This stops any dust that gets into your system from spreading around.
Open windows whenever possible to get ventilation during removal. Fresh air helps manage dust and creates better working conditions. A box fan in the window (facing outward) creates negative pressure that pulls dust outside instead of into other rooms.
Look at the edges to see how the carpet is secured before cutting. Most carpet stays in place with:
A close look at where carpet meets walls reveals seams. These spots show how it was installed and help you pick the best place to start removal. If you’re learning how to rip out carpet, finding tack strips helps you choose the right tools and techniques.
Seams are important because they show where carpet pieces join. Starting at these points usually makes it easier to pull up the carpet. Use masking tape to mark seams if they're hard to spot.
Room corners make excellent starting points for removal. Note that carpet rarely comes as one piece, so finding where sections meet gives you natural spots to begin and split the job into smaller tasks.

Pick an easy-to-reach corner of the room. Grab the carpet firmly with pliers and pull it up from the tack strip. Once you've freed a section:
Pro Tip: The corner might be tough to grip sometimes. Make a cut about 6 inches from the wall and create a small square "handle." This gives you better control for that first pull.
Free the edges first, then slice the carpet into manageable strips:
|
Strip Width |
Advantages |
Best For |
|---|---|---|
|
3-4 feet |
Easy handling, fits through doorways |
Solo workers |
|
6 feet |
Less cutting needed, faster removal |
Team lifting |
|
Wall-to-wall |
Minimal cutting, rolls up completely |
Empty, small rooms |
Score the carpet's back with your utility knife, fold it over, and cut through completely. Move systematically across the room and roll up each strip. Wrap duct tape around the rolls so they don't come undone during disposal.
The carpet's gone - now let's deal with the padding underneath:
Look over the subfloor carefully as you work. Any staples you miss could damage your new flooring or cause injuries later.
Glued carpet needs a different strategy:
Glued carpet takes more time than tacked installations. Work your way across the room systematically rather than jumping around. You might need adhesive remover to clean the subfloor before putting down new flooring.
The final phase of your carpet removal project requires proper disposal and thorough cleanup. Anyone learning how to remove carpet should pay close attention to this step to avoid environmental issues, fines, or lingering odors from old flooring. A good job here will get your space ready for new flooring and help protect the environment.
After cutting your carpet into manageable strips, roll each section tightly with the backing facing out. Strong duct tape should secure each roll at three points—both ends and the middle. You should double-bag very dirty or moldy carpet sections in heavy-duty construction bags.
|
Carpet Size |
Recommended Rolling Method |
Weight Estimate |
|---|---|---|
|
12×12 room |
3-4 foot wide rolls |
150-200 lbs |
|
Area rug |
Single roll |
20-50 lbs |
|
Wall-to-wall |
4-foot sections |
200-300 lbs |
Pro Tip: You should wear a mask while rolling old carpet because years of dust and allergens will come loose during this process.
Regular trash collection won't take most residential carpet. Here are your disposal options:
Costs will vary based on your location and the amount of carpet. Most waste management companies base their charges on weight or volume.
Your subfloor needs attention after carpet and pad removal:
Concrete subfloors require a shop vacuum first, then a good wash with the right cleaner.
Old carpet leaves stains that you need to fix before putting in new flooring. Look at what kind of stain it is first:
New flooring should wait until your subfloor is clean and dry. Trapped moisture under new flooring makes a perfect spot for mold to grow.
You need to understand the financial and safety aspects of carpet removal to make smart decisions about your flooring project. This knowledge helps you decide whether to do it yourself or hire professionals while staying safe.
DIY and professional approaches have very different cost variables. Knowing the average carpet removal cost helps you plan your budget and avoid surprises. Here’s what you should expect to pay for DIY:
|
Expense Item |
Typical Cost |
|---|---|
|
Basic tools (utility knife, pry bar, pliers) |
$30-$75 |
|
Protective gear (gloves, masks) |
$15-$25 |
|
Waste disposal (dumpster rental/landfill fees) |
$50-$200 |
|
Total DIY Cost |
$95-$300 |
Professional services usually charge $1-$2 per square foot. A 12×12 room would cost about $144-$288 for removal alone.
Pro Tip: Your local recycling center might accept carpet materials, which could reduce disposal costs.
You should protect yourself during removal by:
Good ventilation helps minimize dust inhalation.
The cost savings might look attractive, but some situations need professional help:
These circumstances make the extra cost of hiring professionals worth it because they reduce health risks and potential complications.
You can save hundreds of dollars by removing carpet yourself, and you'll have complete control over the whole process. With simple tools like utility knives, pry bars, and the right protective gear, most homeowners can handle this DIY project. Your preparation matters as much as the actual removal - you'll need to move furniture, protect vents, and locate tack strips to make everything run smoothly.
A step-by-step method will help you quickly work through each phase, from pulling up the first corner to cleaning the subfloor. The job might be physically demanding, but splitting it into smaller sections makes it much easier to handle. Once you're done, proper disposal demonstrates environmental responsibility, and a thorough cleanup will prepare your space for new flooring.
Take a realistic look at your physical abilities and the condition of your space before you start this project. While DIY removal typically costs $95-$300 versus $144-$288 for professional work in one room, some cases need expert help - like possible asbestos or serious water damage. Notwithstanding that, most homeowners find carpet removal an affordable project that builds their confidence to tackle future home improvements.
GET THE ESSENCE OF RELEVANT HOME
IMPROVEMENT TOPICS IN LESS THAN 5 MINUTES

Bathroom Caulking Guide: Best Types and Application Tips
Cracked, peeling, or moldy bathtub caulk is a sign of trouble ahead. When caulk fails, water seep...

Those orange and brown rust stains in your bathtub might be frustrating, but they're completely m...

Thanks for joining our homeowners’ community.
Stay tuned!
Choose the category
Choose the category