
Performance-Driven Energy Efficiency - How to Maximize RO...
Rising energy costs are driving homeowners to make long-term decisions about energy use. Performa...

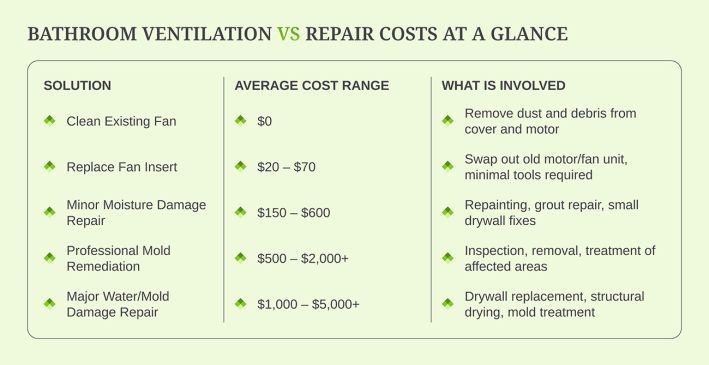
How to prevent mold in the bathroom starts with understanding why this space is such a hotspot: constant humidity, warmth, and organic residue create ideal conditions for growth. Indoor air professionals note that mold starts growing in a damp environment within 24-48 hours. Under these circumstances, minor issues can quickly turn into major repairs. As home maintenance specialist Mark Rivera puts it, “Most mold problems aren’t sudden—they’re the result of small, ignored moisture habits that build up over time.” If left unattended, slight discolorations in the grout or caulk can quickly escalate into structural damage or health concerns. Fortunately, a full bathroom renovation is not needed to address this problem. This article covers simple, budget-saving bathroom mold removal tips, such as improving ventilation and adopting quick daily habits to address vulnerable areas, all aimed at preventing moisture buildup and ensuring your bathroom remains resistant to mold.
Mastering ventilation is the cheapest way to stay ahead of bathroom mold. Ventilate by running an exhaust fan during your showers, and leave it on for at least 20 minutes after you are done. This simple routine is proven to reduce humidity in bathroom spaces before moisture has a chance to settle into grout, walls, and ceilings, where mold thrives.
If your existing fan is loud or ineffective, try some simple maintenance before a full replacement. Remove the fan cover and clean any dust and lint around the motor and fan blades. If cleaning isn’t enough, replacing just the fan insert might be your budget-friendly option. This will improve airflow without the cost of replacing the entire unit.
Many wonder how long to run the bathroom fan after a shower. The answer is simple: run the fan until all moisture, including on walls and surfaces, has evaporated. Instead of using foggy mirrors as a guide, wait until the room feels completely dry. Make consistent ventilation a habit, as it plays a major role in creating a mold-free environment.
Smart humidity sensors can be an affordable addition to your bathroom mold-prevention kit, so you never have to worry about turning your ceiling fan on or off by hand. These devices are installed in the wall switch and trigger when high humidity is detected in a space. Once humidity returns to normal, the sensor sends a signal back to the fan switch to shut it down. This automation helps to reduce humidity in bathroom spaces without changing daily habits.
The prices of smart humidity switches typically vary by model but usually fall in the $30- $50 range. Several brands manufacture them, including Leviton, Legrand, and Enerlites, all of which produce reliable products that meet residential building codes.
These switches are generally equipped with built-in hygrometers that monitor humidity in real time. Many models give you the option to adjust sensitivity and set a minimum time a unit must stay on before stopping. This gives you assurance that the fan runs long enough to fully clear moisture after showers.
Installing smart switches is simple for those who have done some basic electrical work. Typically, one needs a neutral wire to install. However, compared to the costs of repairing water-related issues, installing fans with humidity sensors provides an immediate improvement in ventilation performance at a very low cost.
Small gaps or cracked seals in your bathroom are top entry points for unwanted moisture that can lead to mold. Check places where water collects after each use (for instance, where the bathtub meets the wall, inside shower corners, and at sink edges).
Over time, caulk dries, cracks, shrinks, or flakes off, letting water run beneath tiles and fixtures. Once trapped, moisture creates ideal conditions for hidden mold. Reseal these areas with mildew-resistant caulk to prevent costly damage.
While it may take some additional effort to ensure you have removed all previous caulk and applied an even bead of new caulk, the results will be visible in both appearance and function. A single gap can undo all of your hard work by creating a path for water intrusion. Like many other maintenance activities, this one does not require specialized equipment but provides long-term protection, particularly in high-use areas where moisture exposure is constant.
Choose 100% silicone caulk with antimicrobial properties. Silicone stays elastic for years and resists cracking, while antimicrobial agents help slow mold growth.
Grout is among the most at-risk surfaces in your bathroom, despite how little attention it draws. This is due to its porosity, which creates an opportunity for grout to absorb both moisture and the soap residue that comes with it. All of these elements create the conditions needed for mold to begin forming beneath the surface. While protecting grout may require a relatively minor financial investment, it does require consistent maintenance. Applying a grout sealer is a simple and effective way to support long-term moisture control and help prevent issues before they arise.
There are two budget-friendly options to ensure your grout remains in good condition:
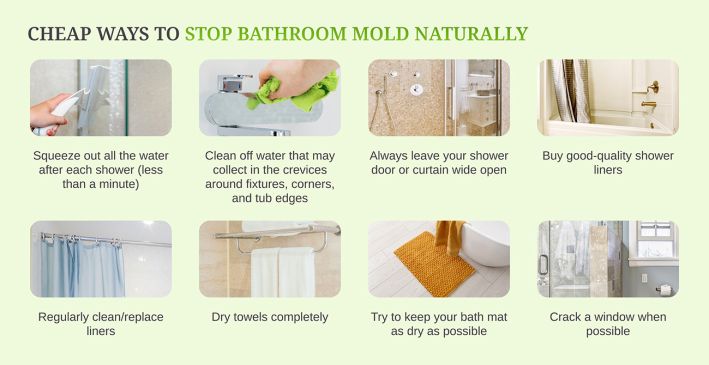 When it comes to molding-proofing your bathroom on a budget, the most effective changes are often the simplest ones you can build into your daily routine. Therefore, rather than using strong cleaning methods or high-cost repairs to remove mold, simply focus on minimizing moisture and maximizing airflow in your bathroom immediately after use. Although these practices will take very little time, they do help limit the conditions that allow mold to grow.
Here are some simple, yet cost-effective ways to get results with your bathroom's humidity:
A dry bathroom is a key part of maintaining your home’s structure and protecting your indoor air quality. Over time, moisture trapped in grout, behind tiles, and around fixtures can quietly cause surface damage or mold growth. Fortunately, there are several ways to prevent these problems without spending money on bathroom renovations or incurring expenses for years to come. Simple, consistent habits paired with a few smart upgrades can make your home more resistant to mold.
Increase ventilation, seal bathroom holes where water could leak in, and clean and maintain routinely. These simple actions make it hard for mold to grow. They also help maintain bathroom finishes, extend the lifespan of materials, and keep your family’s bathing environment enjoyable. Ultimately, be proactive to protect your financial investment and the most used room in your home.

The lion's share of the house remodeling cost should go for roof restoration

Homeowners should keep a close eye on their window efficiency

Going solar should be an ultimate part of any major home renovation project

Install an advanced HVAC system to improve your home's air quality

Add to your house value by updating the look and functionality of your bathroom

Consider a kitchen remodeling to make it more welcoming and comfortable

Keep the gutter system in mint condition to prevent any damage to the integrity of your home.

Install new flooring to enhance your home's appearance and add extra value to it

Replace the exterior siding to spruce up your home's curb appeal and increase its sale value

Equip your home with a walk-in tub to enjoy improved safety while taking a bath
GET THE ESSENCE OF RELEVANT HOME
IMPROVEMENT TOPICS IN LESS THAN 5 MINUTES
Performance-Driven Energy Efficiency - How to Maximize RO...
Rising energy costs are driving homeowners to make long-term decisions about energy use. Performa...

In 2026, the bathroom is evolving from a purely functional space into a true SPA-like relaxation...

Thanks for joining our homeowners’ community.
Stay tuned!
Choose the category
Choose the category