
How to Use a Gutter Installation Cost Calculator the Righ...
Most homeowners hit the same wall when they start planning a gutter project. You know your roofli...

Memorial Day weekend is the unofficial kickoff for homeowners who want to upgrade their homes. With summer right around the corner and a few warm spare days, it draws more DIY activity than any other weekend in May. If you have some minor update projects you have been putting off, Memorial Day weekend is the perfect time frame to complete them. Here we cover five realistic Memorial Day DIY projects that are good to start and finish within 2 days, including a gutter tune-up, deck refresh, exterior caulking, dryer vent cleaning, and a garage pegboard setup. Each one comes with a list of tools and materials as well as a realistic time estimate. No full remodels, no contractor required, just manageable work you can finish in a weekend.

Difficulty: Beginner–Intermediate
Cost: Under $80
One of the least expensive weekend home improvement projects is a gutter tune-up, yet it brings a tangible return on investment. Clogged or leaky gutters often become culprits of your foundation flooding, fascia board rotting, and siding's premature deterioration. Catching issues now costs almost nothing, but overlooking them can cost thousands.
Put your ladder on a level ground before you climb. If you are going to lean against the roof gutters, add a standoff to prevent damage. Do not work alone — have someone hold the bottom of the ladder for you. Always keep three points of contact when atop a ladder (2 feet and 1 hand, or 1 foot and 2 hands). Wear special gloves and slip-resistant shoes. Bring a separate bucket with debris to free your hands.
|
Item |
Average Cost |
|---|---|
|
Scoop or garden trowel |
~$5 |
|
Hose with nozzle spray |
~$15 (if you don't have one) |
|
Gutter sealant |
~$8 |
|
Roofing cement |
~$10 |
|
Metal gutter patch kit |
~$12 |
|
Gloves and goggles |
~$15 |
|
Ladder stabilizer |
~$25 (reusable) |
Clean and flush. Hand clean dirt and leaves from the gutters, working toward the downspout outlet. Once clear, flush with a garden hose to check the flow. If the water does not drain freely, use more water pressure to clear it or get an inexpensive thin auger to beat a stubborn blockage in the downspout.
Patch holes. Put roofing cement in holes made from rust, nails, or weathering. Clean the area first. Then dry it. Use a putty knife to spread some cement. Press your new metal piece into place.
Sealant touch-up. Check joints and end caps for dried-out sealant. Reapply gutter sealant where needed and let it cure before the next rain.
DIY works well for cleaning, minor patching, and sealant touch-ups. Call a local gutter professional if there are any sagging sections that need rehinging, large holes or cracks, water damage behind the fascia, or if your roof pitch makes safe ladder work unrealistic.
 Time estimate: 1.5 days (plus 2–3 days drying time)
Difficulty: Beginner–Intermediate
Cost: $80–$150
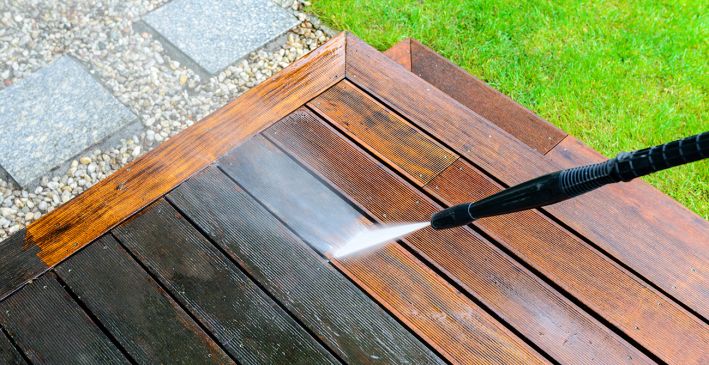
The deck cleaning and re-staining project is a rewarding, simple 2-day DIY project you can complete over a long weekend. It delivers a noticeable transformation and adds real curb appeal to your property as we head into summer. Schedule at least 2 consecutive dry days, with no rain forecast for 24–48 hours after staining.
Match the color of your stain to the type of wood you are using and the amount of sun your deck will be exposed to. Oil-based stain is usually the way to go when working on older wood because it penetrates the wood, providing more durable results than water-based stain. On the other hand, if you have a newer pressure-treated wood deck, you probably want to use a water-based stain because they dry more quickly and can cost less initially. The solid stain option offers greater durability in high-traffic areas, while semi-transparent finishes let you see the grain of your wood.
|
Item |
Average Cost |
|---|---|
|
Backpack pump sprayer |
~$30 |
|
Biodegradable wood cleaner |
~$15 |
|
Borate wood treatment |
~$20 |
|
Long-handled stiff-bristle scrub brush |
~$12 |
|
Long-handled sponge mop/applicator |
~$10 |
|
Oil-based deck stain (1 gallon) |
~$40–$55 |
|
Exterior-grade varnish (½ pint) |
~$10 |
|
Cordless drill and mixing paddle |
reuse from toolkit |
Day 1 — Clean and treat. You need a spray bottle that is at least 1 liter to clean a deck. Add an equal amount of biodegradable wood cleaner to your spray bottle as you do water. First, wet the entire surface of your deck, including all railings, by spraying them down with a garden hose. Then use your spray bottle to apply the cleaning solution onto your deck. Allow it to sit on your deck for 10 minutes and scrub your deck and railings with a stiff-bristle brush to remove dirt and grime. Then thoroughly wash your deck. Next, apply a borate solution (5 parts water to 1 part borate) to your deck with a spray bottle to kill the algae and prevent it from growing back. Let the deck dry completely. It may take 2-3 days, depending on the weather.
Day 2 — Stain. To prepare to stain your deck, mix together 1 gallon of oil-based deck stain with ½ pint of outdoor-grade varnish. Use a sponge applicator when applying two coats of this stain mixture. This will provide your stained deck with additional protection and help it last longer. Always follow the direction of the grain of your deck.
DIY works well for standard flat decks that are generally in good shape. If your deck shows signs of rot or structural damage, or if you have multi-level decking with complex railings, consider hiring a contractor. Lastly, if your deck has not been maintained for many years, it's most likely to need sanding or board replacement before staining.
 Time estimate: 3–4 hours
Difficulty: Beginner
Cost: Under $50
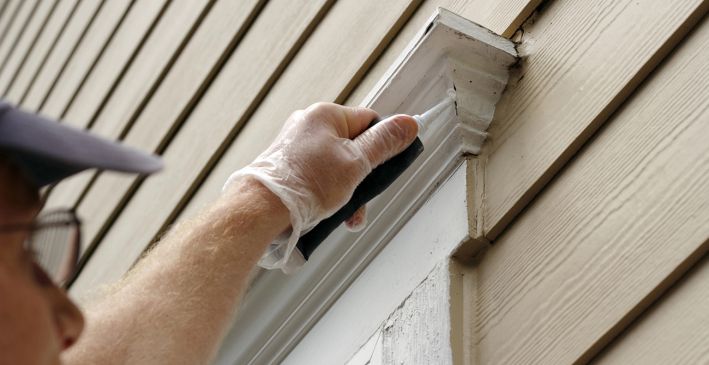
Exterior caulking is one of those easy weekend renovations that only takes you a few hours to complete and pays for itself throughout the entire summer. Small gaps and cracks around windows, doors, and siding allow cooled interior air to escape while also allowing heated outdoor air into your home. As this occurs, your air conditioning unit has to work much harder to cool your home, which increases your energy costs. A fresh coat of caulk seals openings before they become major sources of energy loss.
To identify potential areas of concern in your home’s exterior, inspect the following:
Note! If you have cracked, shrunk or missing caulk in any of these specific areas, prioritize addressing them.
The majority of exterior joints are caulked with polyurethane. It adheres very well to wood, brick, and masonry, and can be painted over. Additionally, polyurethane can expand or contract with changes in temperature within a joint more effectively than silicone.
Larger gaps seal much more effectively than smaller ones. A small gap can go through approximately 100% of its width due to temperature changes. Most caulks cannot withstand this type of movement. Deep gaps should have a backer rod used initially to control the depth of the gap, thereby avoiding a three-way bond (where caulk sticks to both sides and the bottom of a gap, reducing its flexibility).
Silicone performs better in areas that are regularly exposed to water (for example, where a window meets a wet surface). Silicone provides greater resistance to water damage and remains more flexible longer. However, because silicone cannot be painted, it should be considered when planning areas that are visible.
Use a utility knife to remove failed caulk. Clean your surfaces from dirt and debris and let them dry. Cut the nozzle of the caulk tube at an angle so that you can get about 1/8 inch in the gap. Apply a steady stream of caulk by holding the nozzle tip directly above the area. Pressing down on the nozzle will force the caulk into the gap. Use a wet finger or a caulk finishing tool to neaten the caulk bead. Clean up any extra caulk with a wet rag excess before the caulk dries.
|
Item |
Average Cost |
|---|---|
|
Polyurethane exterior caulk (2–3 tubes) |
~$8–$12 each |
|
Silicone caulk (1 tube, for wet areas) |
~$8 |
|
Caulk gun |
~$10 |
|
Caulk remover tool |
~$6 |
|
Utility knife |
~$5 |
|
Backer rod (for deep gaps) |
~$6 |
Caulking is one of the simplest weekend home improvement projects you can do yourself. You might need a contractor only if you have major gaps, rot around window or door frames, or moisture damage behind the siding.
Time estimate: 1–2 hours
Difficulty: Beginner
Cost: Under $40
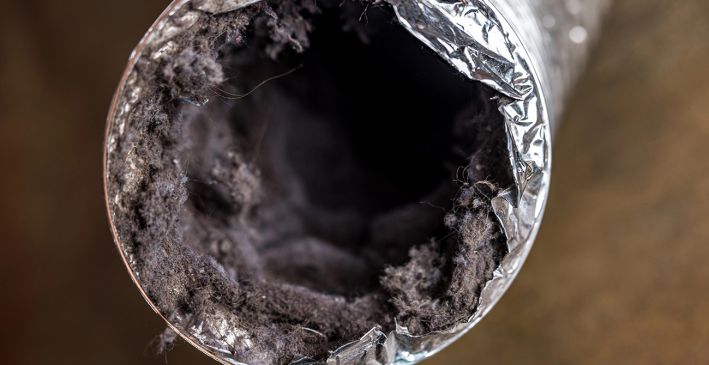
Cleaning your dryer's vent is an often-overlooked task on your Memorial Day home checklist, but it is also one of the many ways you can eliminate a major fire hazard in just a couple of hours. Lint builds up in the rear of the vent over time, blocking airflow. This means the dryer has to run longer than necessary, which causes overheating. According to the U.S. Fire Administration, overheating is the third most frequent cause of residential fires in America. Cleaning your dryer's vent can be done in about two hours for under $40 and cuts drying times by 25–40% right away. It also reduces the likelihood of having to deal with a fire down the road.
|
Item |
Average Cost |
|---|---|
|
Dryer vent brush kit (flexible rods + brush head) |
$25–$40 |
|
Vacuum and hose extension |
reuse from home |
|
Flathead screwdriver |
reuse from toolkit |
|
Foil duct tape |
~$8 |
Remove the dryer and pull off the back panel. Now, insert your flexible brush rods into the duct from the inside of the dryer. This will allow you to push the lint towards the outside exhaust cap. Next, connect one end of the vacuum hose to the front of the dryer and the other to the outside exhaust cap. Now, slowly move along both ends of the duct, pulling out all remaining lint. Once you've cleaned the entire duct, put the hose back on. Put some aluminum foil duct tape in any hole or gap you find where air may be escaping.
DIY vent cleaning is effective for straight or single-bend duct runs. For specific cases, when you have a longer run with many turns or a system that vents through the roof rather than a side wall, contact a pro. Equipped with a powered rotary brush system, they will do a more thorough job.
 Time estimate: 4–6 hours
Difficulty: Beginner
Cost: Under $100
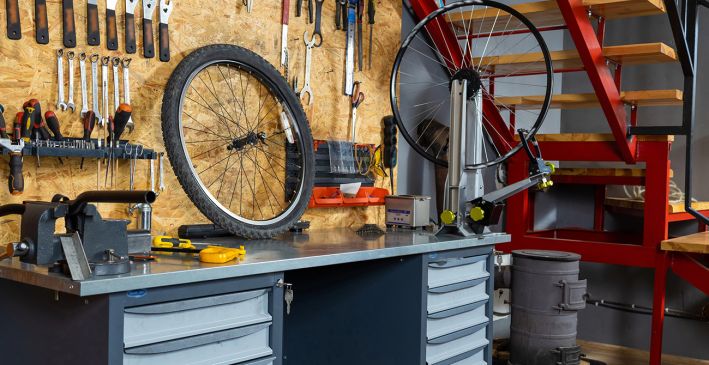
Before summer projects start piling up, there should still be room on your garage floor for a better storage strategy. A tool wall is one of the most practical weekend home improvement projects you can complete in a single day. It maximizes floor space and tool visibility at a fraction of the cost of custom cabinets.
|
Item |
Average Cost |
|---|---|
|
4x4 pegboard sheet |
$20–$30 |
|
Pegboard hook assortment |
$15–$25 |
|
Plywood backer (if needed) |
$20–$30 |
|
Screws and wall anchors |
$5–$8 |
|
Level and pencil |
reuse from toolkit |
|
Stud finder |
~$15 (if needed) |
Pegboard is the least expensive and most beginner-friendly option. A standard 4x8 sheet typically costs $30–$50, and hooks and accessories are readily available at most hardware stores. Installation usually takes a few hours. The main downside is that hooks can slide out when you pull tools off. Fortunately, this problem is resolved by switching to locking hooks.
The French cleat provides a solid, dependable solution that also allows easy adjustments to the positioning of hooks, shelves, or other items. The cleat is constructed from 1/2-inch plywood with a 45-degree cut. Mounting it on the wall as a base for the hardware will provide ample room to adjust your shelf system. Typically, a 4-foot-wide French cleat system costs around $40–$60 in materials.
Slatwall panels are the most sophisticated and hold the most weight, but they cost much more to install, around $60–$120 for a 4-foot section, plus accessories.
Locate the studs in your wall and draw a line at each stud location. If you have unfinished drywall, use a plywood backer to provide a surface for anchoring. Screw the pegboard or cleat strips to the studs. Arrange all your tools on the floor before drawing any lines on the wall, so you can get a feel for how they will be placed.
This project wraps up in a day or two for most homeowners. That said, if your garage walls need structural repairs or you're planning a full custom cabinet and storage system, those jobs are better left to a professional.
Five projects, two days, one long weekend — and something real to show for it. No contractor, no permits, no specialty store runs. The real value isn't just what gets done but what you manage to avoid later. Clogged gutters, dryers that run continuously at high heat, gaps that let conditioned air leak outside during warm weather – those things waste your money, but they do it quietly. A focused Memorial Day weekend is one of the most practical investments a homeowner can make before summer locks in. Start with one project. Finish two. That's already a win.

The lion's share of the house remodeling cost should go for roof restoration

Homeowners should keep a close eye on their window efficiency

Going solar should be an ultimate part of any major home renovation project

Install an advanced HVAC system to improve your home's air quality

Add to your house value by updating the look and functionality of your bathroom

Consider a kitchen remodeling to make it more welcoming and comfortable

Keep the gutter system in mint condition to prevent any damage to the integrity of your home.

Install new flooring to enhance your home's appearance and add extra value to it

Replace the exterior siding to spruce up your home's curb appeal and increase its sale value

Equip your home with a walk-in tub to enjoy improved safety while taking a bath
GET THE ESSENCE OF RELEVANT HOME
IMPROVEMENT TOPICS IN LESS THAN 5 MINUTES
How to Use a Gutter Installation Cost Calculator the Righ...
Most homeowners hit the same wall when they start planning a gutter project. You know your roofli...

Gutter replacement is often postponed until something goes wrong, like a sagging section after a...

Thanks for joining our homeowners’ community.
Stay tuned!
Choose the category
Choose the category