How Long Do Roofs Last? A Detailed Look at Lifespan Expec...
The lifespan of your roof depends heavily on the material you choose, with some options lasting s...

Refinishing hardwood floors provides homeowners with a cost-effective way to restore beauty and increase the value of their homes. When hardwood shows scratches, dullness, or water damage, refinishing breathes new life into these surfaces while preserving their original character. This approach costs just $3-$8 per square foot—significantly less than full replacement. The process transforms worn floors into stunning surfaces that can increase your home's value by up to 5%. Refinishing also extends the life of your existing floors while maintaining the unique grain patterns and history that make hardwood so appealing. However, you'll need to plan for 24-72 hours of drying time before walking on the finished surface. This guide walks you through each step of the refinishing process, from evaluating your floor's condition to applying the final protective coat. Whether you're restoring a vintage floor or refreshing a more recent installation, you'll learn the techniques needed to achieve professional-quality results on a weekend timeline.
Timing your refinishing project correctly saves money and prevents further damage to your floors. Most hardwood floors require refinishing every 7-10 years, though this timeline depends on foot traffic levels, maintenance habits, and the quality of previous finishes.
Your floors will show clear indicators when they need attention. Watch for these key warning signs:
Test your floor's condition by dropping a few drops of water in a high-traffic area. Water that beads up means your finish remains intact. Water that slowly absorbs indicates your protective layer has worn thin and needs refinishing.
Select the appropriate approach based on your floor's current condition and your objectives.
|
Feature |
Recoating (Screen & Recoat) |
Full Sanding |
|---|---|---|
|
Best for |
Surface scratches, dullness |
Deep damage, stain changes |
|
Process |
Light abrasion, new topcoat |
Complete sanding to bare wood |
|
Time required |
1-2 days |
3-5 days minimum |
|
Cost |
$1-3 per square foot |
$3-8 per square foot |
|
Disruption |
Minimal |
Significant dust, furniture removal |
|
When to choose |
Every 2-3 years for maintenance |
Every 7-10 years or after damage |
Recoating works well for floors with surface wear but an intact stain underneath. This option creates much less dust than full sanding. Full sanding becomes necessary when you have deep scratches that penetrate to bare wood or when you want to change your floor's color entirely.
Consider seasonal timing before starting major refinishing projects. Wood expands during humid summer months and contracts in winter. Filling gaps during winter can cause filler to squeeze out when boards expand later. Most professionals recommend filling only significant gaps to allow for natural wood movement.
Hardwood floors can typically withstand up to 10 refinishing cycles during their lifetime, depending on the thickness of the wood layer and the thoroughness of each sanding process. Once you've decided refinishing is necessary, proper preparation becomes crucial for achieving professional results.

Remove all furniture, window treatments, and floor coverings from the room. Use a pry bar to carefully remove baseboards, labeling each piece for easy reinstallation. Inspect the floor for protruding nails or staples and address these before beginning the sanding process.
|
Essential Tools |
Purpose |
|---|---|
|
Drum sander |
Removes old finish and levels the wood surface |
|
Edge sander |
Reaches corners and edges |
|
Floor buffer |
Creates a smooth surface after sanding |
|
Shop vacuum |
Removes dust between stages |
|
Tack cloth |
Picks up final dust particles |
|
Putty knife |
Applies wood filler to gaps |
|
Applicator pads |
Applies stain and finish evenly |
|
Safety gear |
Protects lungs, eyes, and ears |
Cover all vents, doorways, and adjacent areas with plastic sheeting and painter's tape. This prevents sanding dust from spreading throughout your home—a crucial step that many DIYers overlook.
Start with coarse-grit sandpaper (36-40 grit) on the drum sander, moving with the wood grain. Work methodically across the floor, overlapping each pass slightly to ensure even coverage.
Use an edge sander with matching grit paper for corners and edges that the drum sander cannot reach. Vacuum thoroughly between each stage, then progress through finer grits:
Complete the process with a floor buffer fitted with a 120-grit screening pad to eliminate remaining imperfections.
Fill larger gaps and holes with wood putty after sanding is complete. Only fill substantial gaps—smaller ones accommodate natural wood expansion and contraction with seasonal humidity changes. Filling small gaps during winter can cause filler to squeeze out when boards expand in summer.
Clean the floor thoroughly before applying any finish:
Any dust remaining on the surface will become permanently trapped in your finish, creating imperfections.
Consider water-popping the floor before staining—dampening the surface with water and allowing it to dry completely opens wood fibers for more even stain acceptance.
Apply stain using a foam applicator, working in small sections and wiping excess with clean cloths. Allow 24-48 hours for complete drying before proceeding to the finish application.
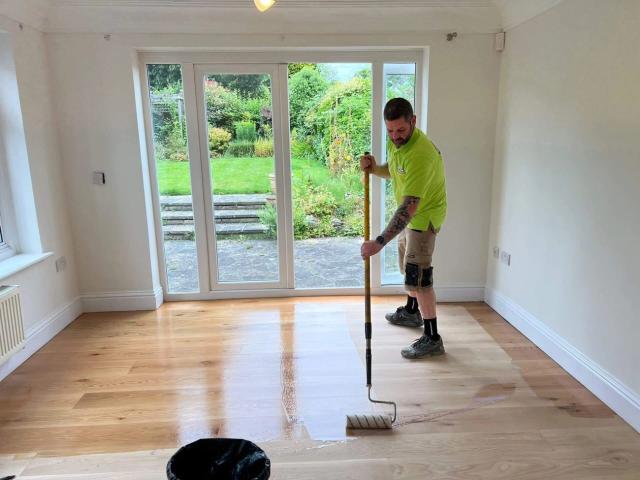
Apply polyurethane using a lambswool applicator, starting at the far corner and working toward your exit. Oil-based polyurethane provides a smoother finish but requires longer drying time (up to 10 hours) compared to water-based options (2-4 hours between coats).
Apply multiple coats according to the manufacturer's specifications, lightly buffing between each coat for optimal adhesion and smoothness.
Choosing between DIY refinishing and hiring professionals depends on your budget, available time, and comfort level with specialized equipment. Each approach offers distinct advantages and challenges that affect both cost and final results.
The financial difference between DIY and professional refinishing varies significantly:
|
Cost Factor |
DIY Approach |
Professional Service |
|---|---|---|
|
Equipment Rental |
$150-300 (sanders, buffers) |
Included in service |
|
Materials |
$100-300 (stain, finish) |
Included in service |
|
Labor |
Your time (2-4 days) |
$2-8 per square foot |
|
Total Average Cost |
$1-3 per square foot |
$3-8 per square foot |
For smaller spaces under 500 square feet, DIY projects can deliver satisfactory results if you're comfortable with power tools. Larger areas typically benefit from professional expertise and equipment.
Cost savings represent the primary advantage of DIY refinishing. However, drum sanders require practice to operate safely—inexperienced use can create permanent gouges in your flooring. The dust generated during sanding often spreads throughout the house despite protective measures, and achieving even stain coverage takes considerable skill.
DIY projects work best for homeowners with some woodworking experience who can dedicate uninterrupted time to complete all stages properly. Rushing any phase of the process typically leads to visible imperfections.
Professional contractors bring specialized equipment, dust containment systems, and experience that typically produce superior results. They complete projects faster and can address unexpected issues like structural repairs or moisture problems that DIY refinishers might overlook.
When hiring professionals, evaluate candidates by:
Professional services cost more initially but often provide warranties on workmanship and better protection of surrounding areas. Most reputable companies offer free on-site inspections before providing quotes.
The finish you select affects both the appearance and durability of your refinished floors. Different products offer varying benefits in terms of drying time, durability, and environmental impact. Understanding these options helps you choose the right finish for your specific situation.
Oil-based polyurethane costs $20-30 per gallon and provides a smooth application with superior durability in high-traffic areas. This finish creates a rich, amber tone that deepens over time, making it ideal for homeowners who want a traditional hardwood appearance. However, oil-based products require 8-10 hours between coats and produce strong odors that demand proper ventilation.
Water-based polyurethane costs $30-50 per gallon but dries much faster, requiring only 2-4 hours between coats. This finish maintains the wood's natural color without yellowing and produces fewer volatile organic compounds (VOCs), making it safer for households with children or pets. While slightly less durable than oil-based options, water-based finishes continue improving in performance.
Hard wax oil products offer an environmentally conscious option that penetrates the wood rather than forming a surface film like polyurethane. These finishes create a protective layer that you can repair without complete refinishing. The products are relatively new, so some contractors may be hesitant to use them.
Low-VOC products, such as Pallmann, reduce chemical emissions compared to standard finishes while offering comparable performance. These options have improved significantly and provide excellent results without the environmental impact of traditional finishes.
Satin finishes have become increasingly popular, especially for families with children, because they're less slippery than high-gloss alternatives. Many homeowners now prefer matte finishes that conceal dust and imperfections more effectively than shinier options.
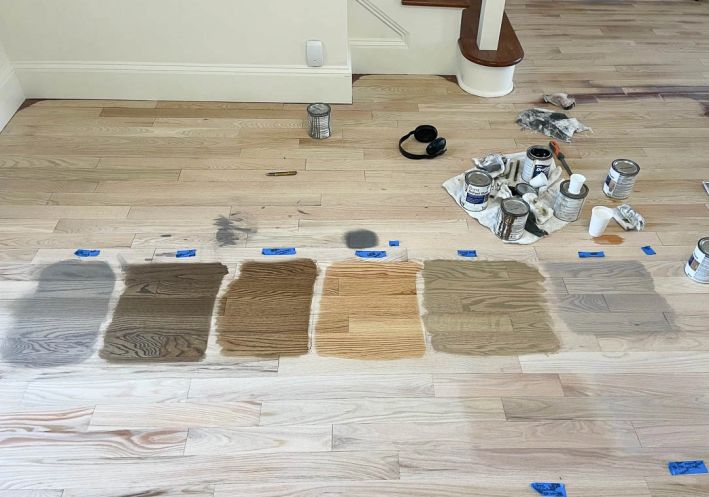
Always test stain colors on an inconspicuous area or scrap wood before applying to your entire floor. Stains often appear different on actual wood than on sample cards, so testing prevents costly mistakes.
Planning your refinishing project requires understanding both the time commitment and financial investment involved. The process delivers excellent returns when selling your home while costing significantly less than replacement.
DIY projects for spaces under 500 square feet can be completed over a weekend, though you'll need additional days for proper drying. Professional projects follow this timeline:
|
Process Stage |
Time Required |
|---|---|
|
Preparation & sanding |
1-3 days |
|
Staining application |
1 day |
|
Drying between coats |
24-48 hours per coat |
|
Final drying before use |
2-7 days |
Oil-based polyurethane requires up to 10 hours drying time between coats, while water-based options dry in just 2-4 hours—an important consideration for tight schedules.
The financial investment varies based on project scope and approach:
Professional services typically cost $3-$8 per square foot, with labor representing the largest expense at $2-$8, depending on your location and project complexity. Material costs include:
Projects requiring extensive repairs or structural work fall at the higher end of this range. Refinishing costs approximately 30-50% of replacement expenses, making it an economical choice for maintaining your home's value.
Proper care of your newly refinished floors protects your investment and maintains their beauty for years. Wait at least 24 hours before walking on the surface, though most professionals recommend 48-72 hours for complete curing.
Your refinished floors require specific care to preserve their finish and appearance:
|
Cleaning Method |
Products to Use |
Products to Avoid |
|---|---|---|
|
Regular sweeping |
Soft-bristle broom |
Stiff bristles (can scratch) |
|
Vacuuming |
Soft brush attachment |
Beater bars |
|
Damp mopping |
Microfiber cloth, specialized hardwood cleaner |
Steam, water, suds-producing cleaners |
Place felt pads under furniture legs to prevent scratches when moving items. Area rugs in high-traffic zones help distribute wear evenly across the floor's surface. Rotate these rugs periodically to ensure uniform aging of the finish.
Avoid dragging furniture immediately after refinishing. The finish continues to harden over the first few weeks, making it more susceptible to damage during this period.
Most refinished floors require maintenance coats every 3-5 years, depending on foot traffic and the level of care. Watch for these signs that indicate recoating time:
A maintenance coat (screen and recoat) costs significantly less than complete refinishing while extending your floor's life without the mess of full sanding. This preventive approach helps maintain the value you've created through your refinishing project.
Hardwood floor refinishing offers homeowners an effective way to restore beauty while preserving the character of existing floors. This project costs just 30-50% of replacement expenses while potentially increasing your home's value by up to 5%.
The key to successful refinishing lies in choosing the right approach for your situation. Spaces under 500 square feet with surface-level wear often work well for DIY projects, while larger areas or floors requiring extensive repair benefit from professional expertise. Remember to plan for adequate drying time; rushing this stage compromises your results, regardless of the approach you choose.
Proper maintenance after refinishing determines how long your investment lasts. Simple practices, such as using furniture pads, regular sweeping with soft-bristled brooms, and recoating every 3-5 years, can extend your floor's lifespan.
Whether you decide to tackle this project yourself or hire professionals, refinished hardwood floors provide excellent long-term value. They enhance your living space while costing significantly less than replacement, making refinishing a smart choice for maintaining your home's appeal and worth.
GET THE ESSENCE OF RELEVANT HOME
IMPROVEMENT TOPICS IN LESS THAN 5 MINUTES

How Long Do Roofs Last? A Detailed Look at Lifespan Expec...
The lifespan of your roof depends heavily on the material you choose, with some options lasting s...

Standing seam metal roofs cost between $7.54 and $39.43 per square foot, making them a significan...

Thanks for joining our homeowners’ community.
Stay tuned!
Choose the category
Choose the category