Roof Insurance Claim Process Explained for Homeowners
Filing a roof insurance claim involves specific steps and requirements that can significantly imp...

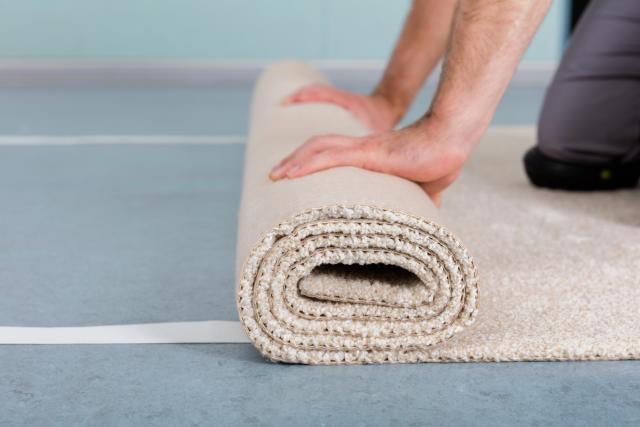
Fitting carpet yourself offers substantial savings compared to hiring professionals, but requires proper preparation and technique to achieve quality results. Professional carpet installation typically costs between $3.50 and $11 per square foot, while DIY installation can reduce your costs to as low as $2 per square foot when you handle the labor yourself. DIY carpet laying gives you complete control over timing and quality, allowing you to work at your own pace and ensure every detail meets your standards. Most carpet installations can be completed over a weekend, even by first-time installers, though the process demands patience and attention to detail. With the right tools and preparation, it’s a manageable project for motivated homeowners. This guide covers the complete carpet installation process, from measuring your space and gathering materials to stretching techniques and finishing touches. You'll learn the essential steps needed for professional-looking results, along with guidance on when certain situations might warrant hiring a professional instead. Whether you're looking to save money or gain hands-on experience with home improvement, proper planning and technique make successful carpet installation achievable for most homeowners.
Installing carpet yourself offers several advantages beyond cost savings. Understanding these benefits helps you determine whether DIY installation is suitable for your specific project.
Professional installation typically accounts for 20-50% of the total cost of your carpet project. Installing carpet yourself eliminates these labor costs entirely, resulting in substantial savings.
|
Expense Category |
Professional Installation |
DIY Installation |
|---|---|---|
|
Labor Costs |
$2-5 per square foot |
$0 |
|
Equipment Rental |
Not applicable |
$50-100 per day |
|
Time Investment |
4-8 hours |
8-16 hours |
|
Total Cost (500 sq ft) |
$1,750-2,750 |
$1,000-1,250 |
Pro Tip: Many carpet retailers offer free or discounted tool rentals when you purchase carpet from them, further reducing your project costs.
The skills you develop during carpet laying remain valuable for future flooring projects. Your investment in quality tools also pays dividends if you plan to install carpet in multiple rooms over time.
Self-installation gives you complete control over timing and quality. You determine the schedule rather than working around contractor availability, and you can tackle the project room by room instead of disrupting your entire home at once.
Quality control advantages include:
DIY installation also provides intimate knowledge of what lies beneath your flooring, which proves valuable for future repairs and maintenance. For pattern matching in complex rooms, you can take extra time to ensure patterns align perfectly at walls and transitions—attention to detail that rushed installations might overlook.
Best for: Homeowners with flexible schedules who want maximum control over quality and timing.
Successful carpet installation requires specialized tools and materials that differ from those used in typical home improvement projects. Preparing these items in advance prevents mid-project delays and ensures steady progress throughout the installation.
Carpet installation demands specialized equipment alongside common household tools. The right tools determine whether your finished floor looks professionally installed or clearly DIY.
|
Tool |
Purpose |
Rental/Purchase |
|---|---|---|
|
Knee Kicker |
Stretch the carpet and secure it to the tack strips |
Rent ($15-25/day) |
|
Power Stretcher |
Creates proper tension in larger rooms |
Rent ($25-35/day) |
|
Carpet Cutter |
Makes clean, precise cuts |
Purchase ($10-30) |
|
Seam Roller |
Secures seams between carpet pieces |
Rent ($10-15/day) |
|
Carpet Tucking Tool |
Pushes carpet edges into gaps |
Purchase ($5-15) |
|
Utility Knife |
Trims excess material |
Purchase ($5-10) |
|
Hammer |
Installs tack strips |
Common household tool |
|
Measuring Tape |
Ensures accurate room measurements |
Common household tool |
|
Chalk Line |
Marks straight cutting lines |
Purchase ($5-10) |
Pro Tip: Many carpet retailers offer free or discounted tool rentals when you purchase carpet from them. This can significantly reduce your total project cost, so consider asking about rental options before purchasing tools elsewhere.
Quality materials ensure your carpet installation lasts for years. Beyond the carpet itself, several supporting materials are necessary for proper installation.
|
Material |
Purpose |
Approximate Cost |
|---|---|---|
|
Carpet |
Primary flooring material |
$2-8 per sq ft |
|
Carpet Padding |
Provides cushioning and extends carpet life |
$0.30-$1 per sq ft |
|
Tack Strips |
Secures carpet edges around the room perimeter |
$15-25 per room |
|
Carpet Seam Tape |
Joins multiple carpet sections |
$0.50-1 per foot |
|
Transition Strips |
Creates smooth floor transitions |
$15-40 each |
|
Carpet Staples |
Secures padding to the subfloor |
$5-10 per box |
|
Carpet Adhesive |
Bonds carpet in specific areas |
$20-30 per gallon |
Purchase 5-10% more carpet than your measurements indicate. This extra material accounts for cutting mistakes, pattern matching requirements, and irregular room shapes that consume more material than standard calculations suggest.
Accurate measurements prevent costly mistakes and ensure you purchase the right amount of materials for your carpet installation. Proper planning eliminates the frustration of running out of carpet mid-project or ordering excessive amounts of carpet.
Start by measuring your room dimensions at the longest and widest points. Multiply length by width to determine basic square footage. A 10-by-20-foot room requires 200 square feet of carpet as your baseline measurement.
|
Room Shape |
Calculation Method |
|---|---|
|
Rectangular |
Length × Width |
|
L-Shaped |
Divide into rectangles, calculate each separately, then add |
|
Irregular |
Break into smaller sections, calculate individually, then combine |
Measure each room twice to verify accuracy, particularly rooms with angled walls or built-in features. Account for closets and alcoves by measuring them separately and adding their square footage to your total.
Purchase additional carpet beyond your calculated square footage to accommodate:
Standard rooms require approximately 10% more carpet than your measurements. Rooms with complex layouts or multiple angles may require up to 20% additional material.
Patterned carpets require special consideration during the planning phase. Purchase at least 5% more material for pattern matching at seams. Position seams parallel to the room's primary light source to minimize their visibility, and avoid placing seams in high-traffic areas whenever possible.
When working with multiple carpet pieces, ensure the pattern alignment is correct before making any cuts. Place seaming tape beneath carpet junctions with the adhesive side facing up, then use a seaming iron to activate the adhesive and create secure connections between sections.
Proper subfloor preparation determines both the appearance and longevity of your carpet installation. Your floor must be clean, level, and structurally sound before installing any padding or carpet.
Start by removing all debris, dust, and old flooring materials completely. Vacuum the entire area thoroughly—even small particles can create visible bumps under your new carpet. Check for uneven areas using a straight edge across the floor surface.
Fill any depressions with floor leveling compound and sand down high spots. For wood subfloors, apply primer before using leveling compound to ensure proper adhesion.
Pro Tip: A level subfloor prevents premature wear patterns and ensures your carpet maintains its appearance longer.
Test the concrete floors for moisture before installing the carpet. Place a 2×2-foot piece of plastic sheeting on the concrete and secure all edges with tape. Check after 24 hours for condensation or darkening beneath the plastic.
Use a moisture meter for more precise readings if one is available. Concrete with excessive moisture requires sealing with a vapor barrier before carpet installation can proceed.
Remove doors by tapping out the hinge pins with a hammer and nail set. Set doors aside in a safe location where they won't be damaged during installation.
For baseboards, use a pry bar with a thin piece of wood behind it to protect your walls from damage. Mark each baseboard piece with its location to ensure proper replacement after carpet installation. This preparation step prevents damage to your new carpet and saves time during the finishing process.
Tack strips and padding create the foundation for professional carpet installation. These components provide the grip and cushioning necessary for long-lasting, comfortable carpet performance.
Install tack strips around the room's perimeter, leaving ⅜ inch between the strip and the wall. This gap allows carpet to tuck cleanly between the wall and the tack strip for a finished appearance. Use heavy-duty snips to cut strips for corners and doorway transitions.
|
Room Type |
Tack Strip Spacing |
|---|---|
|
Bedrooms |
⅜ inch from the wall |
|
Living Areas |
¼ to ⅜ inch from the wall |
|
Doorways |
Flush with threshold |
Position tack strips with angled pins facing toward the wall. This orientation provides optimal carpet grip and prevents the carpet from pulling away from the edges over time.
Carpet padding should cover the entire floor except for the areas directly over tack strips. Position padding seams perpendicular to your planned carpet seams to prevent weak points from aligning. Butt padding edges together tightly without overlapping or leaving gaps between sections.
Attach padding using a staple gun with ⅜-inch staples placed every 6 to 8 inches along the inside edge of tack strips. For padding seams, center seam tape underneath the joint with equal amounts extending on both sides. Press firmly along the tape to create an invisible, smooth transition between padding sections.
Best for: Rooms up to 200 square feet can typically use standard padding installation techniques, while larger spaces may require additional seam considerations.
With tack strips and padding properly installed, laying the carpet requires careful positioning and precise technique. This phase determines the final appearance and long-term performance of your installation.

|
Consideration |
Recommendation |
|---|---|
|
Pile Direction |
Toward the main entrance for a smoother appearance |
|
Excess Material |
Leave 3 inches at the walls for stretching |
|
Alignment |
Square with the longest wall first |
Allow carpet to acclimate to room temperature for 24 hours before installation to prevent shrinkage or buckling after completion.
Make relief cuts at corners using a sharp utility knife to help the carpet lie flat around obstacles. Cut from the top of the carpet, creating small triangular notches that allow the material to bend without bunching. Make conservative cuts initially—you can always trim more material, but you cannot add it back.
Large rooms often require joining multiple carpet pieces. Place seaming tape underneath where carpet edges meet, with the sticky side facing up. Heat a seam iron to the appropriate temperature, then move it slowly along the tape for 15 to 30 seconds per section. Press carpet edges firmly into the activated adhesive and place weights on the seam until it cools and sets.
Position the seams parallel to the room's primary light source to minimize their visibility. Avoid placing seams in high-traffic areas where they may separate over time.
Proper stretching transforms loose carpet into a professionally fitted floor covering. This final phase prevents future wrinkles, buckling, and premature wear that can occur with poorly tensioned carpet.
Start stretching from one side of the room using a knee kicker positioned approximately 3 inches from the wall. Strike the padded end firmly with your knee to hook the carpet onto the tack strips. For rooms larger than 10×10 feet, a power stretcher becomes essential for maintaining proper tension across the entire space.
|
Tool |
Best For |
Technique |
|---|---|---|
|
Knee Kicker |
Corners, small rooms |
Strike with the knee, work along the wall |
|
Power Stretcher |
Large rooms, main stretching |
Place against the opposite wall, use the lever |
Best for: Always stretch carpet from the center outward to prevent uneven tension that leads to premature buckling.
Trim excess carpet using a sharp utility knife or carpet trimmer, leaving approximately ¼ inch of extra material at the edges. Use a carpet chisel to tuck this remaining edge between the tack strip and the wall, creating a clean, finished appearance without visible raw edges.
Doorways and transitions between different flooring types require special finishing. Install appropriate transition strips where carpet meets tile, hardwood, or other flooring materials. Metal and wooden transition strips are the most common options. Trim carpet flush with the center of the threshold, then secure with transition molding as needed for a professional finish.
Carpeting stairs requires specialized techniques compared to standard room installations. Professional stair carpet installation typically costs 2-3 times more than regular flooring, making it an excellent candidate for DIY savings when you're comfortable with the additional precision required.
Two primary installation methods work for stair carpeting, each suited to different situations:
|
Method |
Description |
Best For |
Difficulty Level |
|---|---|---|---|
|
Cap-and-Band |
The carpet wraps tightly around each tread and riser |
Formal spaces, patterned carpet |
Moderate-High |
|
Waterfall |
The carpet flows continuously from tread to riser |
Casual spaces, quick installation |
Low-Moderate |
The Cap-and-Band method creates a tailored appearance with carpet contoured tightly around each step edge. The Waterfall technique requires less cutting and uses about 15% less material overall, making it more budget-friendly for larger staircases.
Pro Tip: For the Cap-and-Band method, add 2 inches to each measurement to account for wrapping around step edges.
Start installation by securing tack strips to the bottom of each riser and the back of each tread. Measure each stair individually since dimensions often vary slightly throughout a staircase. Work from bottom to top, regardless of which method you choose, as this provides better control over carpet alignment and tension.
Most DIY carpet installation problems stem from rushing through key steps or skipping important techniques. These common mistakes can add cost and reduce the quality of your finished project.
|
Common Mistake |
Impact |
Prevention Strategy |
|---|---|---|
|
Insufficient stretching |
Carpet bunching and premature wear |
Use a power stretcher for rooms larger than 10×10 feet |
|
Poor seam execution |
Visible, weak connections |
Place seams away from high-traffic areas and direct light |
|
Incorrect tack strip placement |
Carpet detachment from the edges |
Maintain a consistent ⅜-inch gap from walls |
|
Inadequate padding |
Reduced carpet lifespan |
Choose an appropriate thickness; never skip padding |
|
Improper cutting technique |
Wasted materials |
Measure twice, cut once, using sharp blades |
Replace your utility knife blade frequently throughout the project. Dull blades tear carpet fibers rather than making clean cuts, creating jagged edges that won't properly secure to tack strips.
Time management often becomes an issue for first-time installers. Most homeowners require 1-2 days to complete an average-sized room when working at a careful pace. Rushing through steps to meet unrealistic deadlines typically leads to mistakes that require redoing work.
Temperature matters more than most people realize. The carpet should acclimate to room temperature for at least 24 hours before installation to prevent later shrinkage or expansion that can cause wrinkles or gaps.
The physical demands of carpet installation catch many DIYers off guard. Protect your knees with quality knee pads and recruit a helper for moving furniture and handling large carpet rolls. Your back and knees will thank you, and the extra hands make the job safer and more efficient.
While DIY carpet installation offers significant cost savings, certain situations require professional expertise. Understanding when to call in the experts helps you avoid costly mistakes and ensures the best results for your investment.
|
Scenario |
Professional Recommended |
Typical Cost Increase |
|---|---|---|
|
Rooms larger than 20×20 feet |
Yes |
15-25% |
|
Intricate patterns requiring precise matching |
Yes |
20-30% |
|
Unusual room shapes (curved walls) |
Yes |
25-35% |
|
Damaged subfloors needing structural repair |
Yes |
40-60% |
|
Multi-level installation with complex transitions |
Yes |
30-45% |
Consider professional installation when working with expensive carpet materials—mistakes with high-end wool or custom carpets can quickly exceed your DIY savings. Time constraints also favor professional help, as experienced installers typically complete in hours what might take DIY installers multiple days.
Unusual staircases with curved steps or custom railings often require specialized techniques beyond basic DIY skills. Older homes with unlevel floors or complex architectural features present challenges better handled by experienced installers who can adjust techniques for these irregularities.
Many carpet retailers offer installation warranties only with professional installation, which typically adds $2-4 per square foot but includes guarantees against installation defects. For high-value carpet investments, this warranty protection often justifies the additional cost.
Best for: Complex installations, expensive materials, or when time constraints make DIY installation impractical
GET THE ESSENCE OF RELEVANT HOME
IMPROVEMENT TOPICS IN LESS THAN 5 MINUTES

Roof Insurance Claim Process Explained for Homeowners
Filing a roof insurance claim involves specific steps and requirements that can significantly imp...

Window measurement may seem straightforward, but accurately determining the dimensions for new wi...

Thanks for joining our homeowners’ community.
Stay tuned!
Choose the category
Choose the category